Communication attributes
Each communication channel or group has attributes, displayed as green lines within the device/channel definition. The attributes are intended for monitoring/controlling the communication or for influencing it.
Basic information
Communication attributes (commerror, timestamp) are very useful for tracking communication failures caused by interference, cabling damage, or faults in the communicating device itself. They can be used to automatically, easily and quickly detect the problem and react to it adequately, e.g. by self-correcting mechanism or by declaring an error condition and stopping the normal program operation.
Furthermore, attributes (commblock, forcecomm) can be used for further level of optimization of communication or special use, e.g. repeated value writing for resetting counter input (CNT).
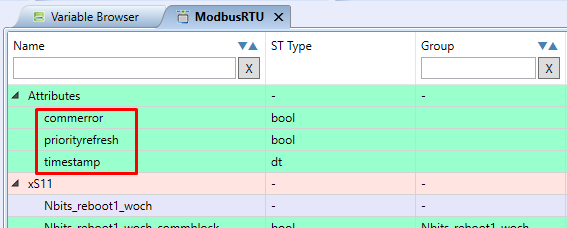
Communication channel
It has three attributes:
| Meaning | Data type | |
|---|---|---|
| commerror | error in the last communication | BOOL |
| priorityrefresh | currently has no application | BOOL |
| timestamp | time of the last successful communication | DATE_AND_TIME (DT) |
Communication Group
It has up to four attributes:
| Meaning | Data type | Use | |
|---|---|---|---|
| commblock | disabling communication | BOOL | all groups |
| commerror | last communication error | BOOL | all groups |
| forcecomm | manual write start | BOOL | only woch groups |
| timestamp | time of last successful communication | DATE_AND_TIME (DT) | all groups |

Detailed description of Attributes
commblock
Commblock is an attribute that allows you to skip group communication. If the value of the attribute is TRUE, the communication of the entire group is skipped. This attribute is the BOOL data type and allows read and write of its value.
commerror
Commerror is an attribute indicating a communication error. If the value of the attribute is TRUE, a communication error has occurred (of the group or the whole channel). This attribute is of the BOOL data type and is intended for read-only.
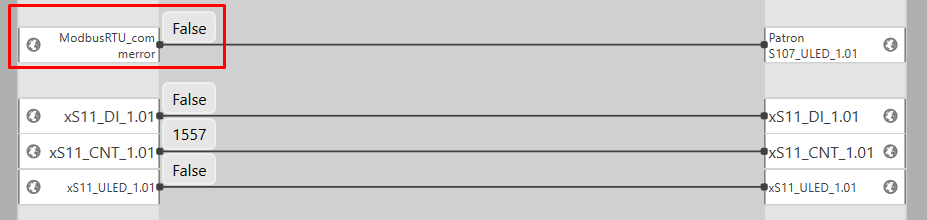
Example of the commerror attribute usage
For this example, the communication channel commerror attribute is connected to the user LED X1 (on the PLC). Since the communication is error free, the LED is off - state FALSE:
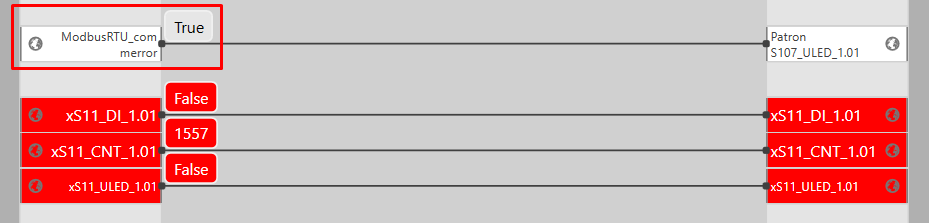
A communication channel error between the PLC and the xS11 expansion module can be simulated by pulling out the RS-485 communication line connector. This condition is induced in the following picture, when the user LED X1 on the PLC lights up - the TRUE state, thus indicating a communication error.
In debug mode, Mervis IDE displays the variables of the non-communicating device with a red highlight, indicating a communication error:
forcecomm
Forcecomm is an attribute that allows forcing group (query) communication. It can be used only for write groups with the WOCh (Write Only on Change) parameter. This attribute is of the BOOL data type and allows read and write of its value.
- Commblock takes precedence over forcecomm i.e. on a rising edge on both forcecomm and commblock the communication is skipped.
- Forcecomm ensures that the write mechanism is triggered even if the value of the variable has not changed.
- Forcecomm is not included in some library device definitions because they were created before forcecomm was implemented. In order to use the forcecomm attribute, it is necessary to:
- right click on the device and select “Create Specific” to edit the device from the library
- open this device by double-clicking
- right click between groups and data points to add a new communication group
- copy the properties of the original group
- mark the data points of the original group and change the group to which they are assigned in their properties
- delete the original group and give the new group the name of the original group
timestamp
Indicates the time of the last communication (query). The attribute is of the DATE_AND_TIME (DT) data type and is intended as read-only.

How to generate variables for Attributes
To generate variables for attributes in full mode, you need to open the device or communication channel (ModbusRTU channel in the screenshot below), click on the attribute, set “Enable Autogen” to TRUE in its properties in the right column and select “Target project”. You can also enter a custom variable name in the “Generated Variable Name”.

More information can be found in Working with Autogen article.