This is an old revision of the document!
BalenaEtcher (flashing the OS)
The OS image can be written to an SD card using the open-source BalenaEtcher tool (for Windows OS) and then run on Unipi devices.
You can download BalenaEtcher from official web pages.
Caution!
Extreme caution is essential when choosing a disc. Selecting the wrong storage medium could result in data loss on a storage other than the desired one.
Before running the OS on a Unipi device
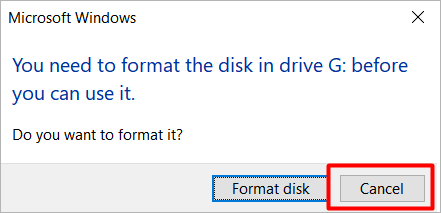
After finishing the flash, or after the storage drive is reinserted into the PC, Windows OS may detect it as a new storage device that it cannot recognize and may request formatting. Close the formatting prompt by clicking on Cancel.
The Windows OS may also display notification that the storage is unavailable. This message can be ignored.
If the OS image has been successfully flashed, the storage will be identified with the name boot when re-inserted into the PC.

If the Mervis OS has been flashed on the storage, there is one last step possible: enabling SSH. The easiest way to do this is to create a file called ssh.txt, or just ssh without the suffix, in the main boot directory of the storage. Alternatively, SSH can be activated directly in the Mervis IDE by changing the RunTime configuration, see section Uploading a RunTime configuration (RT) - unipi specific. For non-Mervis OS, the SSH connection is enabled by default and does not need to be enabled in this way.
After SSH is enabled, you can connect with, for example, Putty.
If SSH is enabled, the operating system must be secured, otherwise unauthorized interference may occur!
Running the OS on a Unipi device
At this moment, the OS is ready on a storage (with SSH enabled). After removing it from the computer, the storage can be inserted into the Unipi device.
Disk storage can ONLY be inserted when the device power supply is unplugged!
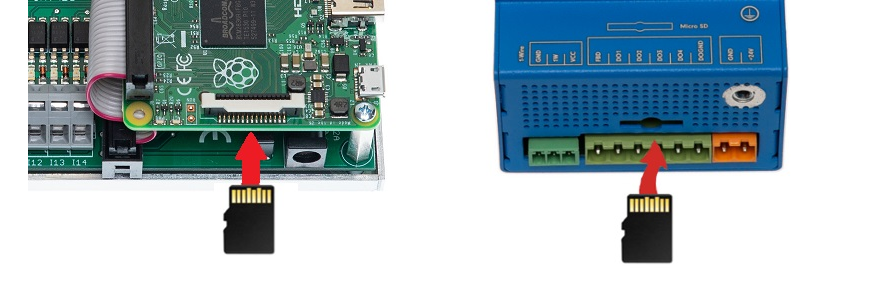
Insert the SD card back side up into the slot (i.e. the gold connectors towards the technician). Plug the power supply in.
Booting the device with the newly flashed OS will take a little longer - about 2 minutes. This is due to the necessary configuration of the OS.