Service mode
Patron
This mode serves for uploading or backing up the operating system, or for restoring access to the unit (restoring the default password via OS reflash, changing the network configuration or enabling/disablíng the SSH access). Only the service web interface is available in this mode, all remaining unit functions are disabled. This mode does not publish mDNS record.
Startup in a service mode
The SERVICE button, usually located next to USB labels, is important for accessing the service mode. The mode is indicated by the slow blinking of all LEDs both in the upper and lower LED row in section 1.
As the next step for both cases, enter the device's IP address into your web browser's address bar.


Note:
The following information is valid only for Unipi devices running Debian 13 and newer.
After entering the address of the device in service mode into the web browser the built-in console with instructions will appear.
For the connection secure version of HTTP protocol (HTTPS) is used. For this reason, after the opening the web the browser can show warning or errors about potential safety issues.
If you are sure you are connecting to the correct address, then you can ignore this warning and continue by “Advanced” or “More options” and “continue to the page”.
Welcome to Unipi service mode.

Your device is protected, for more information see the password documentation.
Defaults are username unipi and password from the device information label.

To exit service mode without logging in, power cycle the device.
If you did not hold service button, your main system is likely corrupted.
E410-sn1253445123-service-mode login:
Continue by entering username: unipi
and factory password written on the information label.
E410-sn1253445123-service-mode login: unipi
Password:
After successful login, few links to service web page are shown.
The links contain a randomly generated temporary password, which is changed after each start in service mode. This means the links are valid only to the next restart of the device and for the next starts in service mode the login is required again.
There should be a link for each network interface present on the device. In the example below there are two of them. First is address obtained by DHCP server and the second is link-local address used for direct connection of the device with PC.
BusyBox v1.38.0.git (2026-06-26 12:30:28 UTC) built-in shell (ash)
Enter 'help' for a list of built-in commands.

You can use this terminal to manage your device or follow these link for graphical interface:


      Open SWUPDATE page on 192.168.1.8


      Open SWUPDATE page on 192.168.200.200
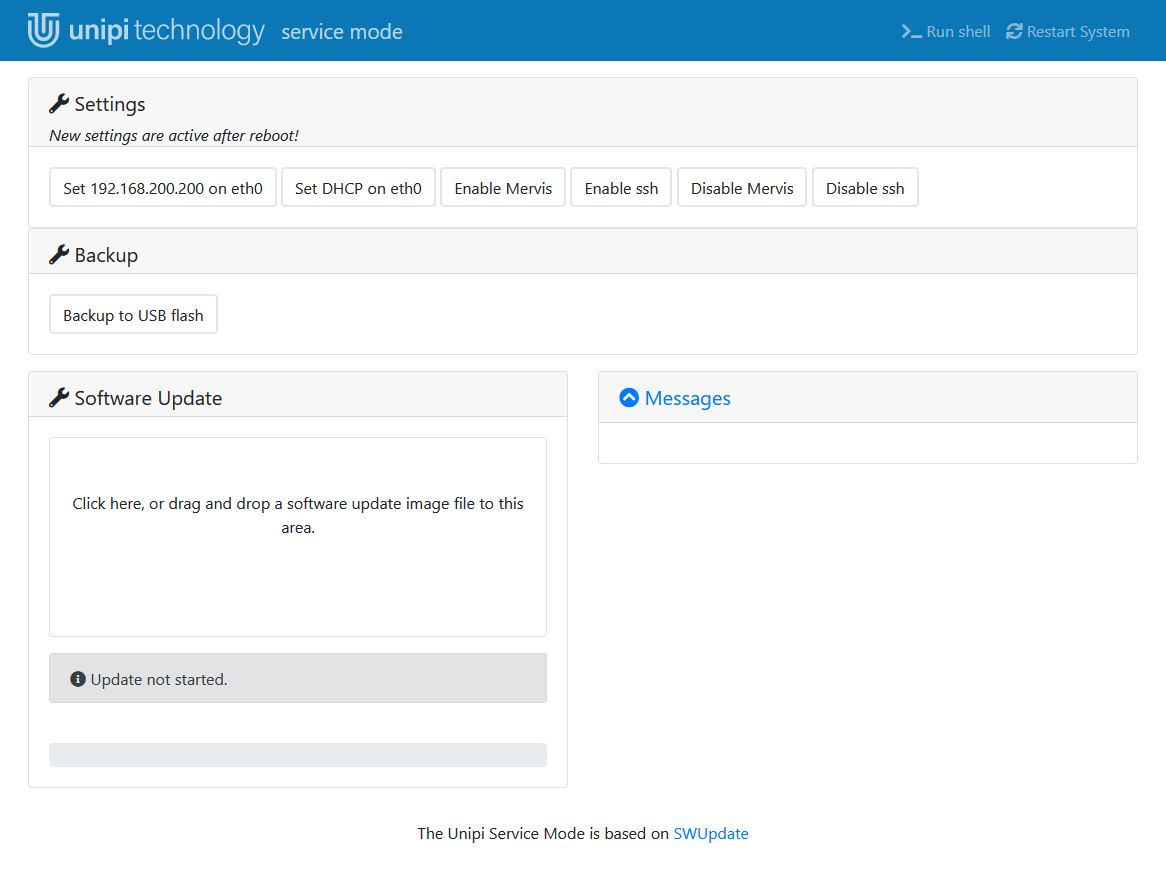
After following one of the links, service web interface is opened. Description of service web interface can be found in the section for each product which has this mechanism.
During opening of the SWUPDATE page similar warning about security problems as in first steps can appear. You can ignore these and continue.
Description of the service web interface
Upon opening the service interface, you can see a blue ribbon on top of the screen and four dialogue windows.
On the right side of the ribbon, there are two buttons:
- Run shell → serves for access to a console with limited options (BusyBox)
- Restart system → reboots the unit
Under the ribbon are the following dialogue windows:
- Settings → contains four buttons, all of them useable only in the regular mode::
- Set 192.168.200.200 on eth0 → sets the ethernet interface to fixed 192.168.200.200 IP address
- Set DHCP on eth0 → sets the ethernet interface to obtain the address from DHCP
- Backup → contains the “Backup to USB flash” button which creates an OS back-up stored on a compatible USB flash disk (if inserted)
- Software update → serves for uploading the OS into the device
- A text field for uploading the archive.swu (containing the OS image) is placed directly under the window's label
- Messages → displays a list of performed operations
If Mervis is used, the Settings dialogue window can contain 2 additional buttons.
- Enable Mervis → launches Mervis RT on the device
- Disable Mervis → stops Mervis RT on the device