Table of Contents
Multiple temperature monitoring using xG18 extension
The following guide demonstrates a quick deployment and testing of a PLC Unipi with three Unipi Extension xG18 extension models, an external web server (HMI), Mervis DB, Mervis Proxy and Mervis SCADA. As this guide assumes this is your first experience with Unipi controllers, every step is thoroughly explained.
Patron
Neuron
Gate
Axon
A demo of this project is available on the Mervis SCADA interface webpage.
- Login: demo
- Password: demo
Prerequisites:
- Unipi Neuron S103 controller running Mervis OS v2.3.0 or newer
- Internet connection
- Any PC with OS Windows and Mervis IDE 2.3.0

The selected Neuron S103 controller serves just as an example. The following guide can be used with any Unipi controller, except Unipi 1.1.
Preparations for this tutorial:
- Download and upload Mervis OS into your PLC and install Mervis IDE
- Connect the xG18 modules to your Unipi PLC using the RS485 interface. Make sure to follow the serial connection scheme (see the picture in the link) and continue to the next xG18 in line. With all xG18’s connected terminate the bus on each end (a switch next to the RS485’s connector). In this case (eg. the bus begins with an Unipi PLCs and ends with xG18 module), use terminating resistors on both of these devices.
- Set Modbus slave addresses on all xG18 modules using their DIP switches (select addresses 1,2,4)
- Connect a power supply to the PLC and all xG18 modules
- Create Unipi customer account via Unipi.Technology webpage. If you already have an account, log in
- Create a Mervis SCADA project. A guide for the process is available in Chapter 1.2 of guide
- Download this project, extract it and open it in Mervis IDE
Editing the project
Your workspace should now look like this:

Right-click on PLC and select Attach PLC. A dialogue window will open - select UDP broadcast and click on Next. If you have a PLC with freshly uploaded OS Mervis, click on Next - otherwise, enter valid data. The system will now look for all PLCs connected to your local network. Choose your PLC (ie. by its MAC address on the manufacturer sticker) and click on Next.
A PLC configuration download dialogue will show. This is not required for now - leave the box unchecked and continue by clicking OK.

Click on PLC to display its properties in the right column. Here, look for Mervis DB parameters and Proxy parameters sections. If you possess only a licence request card with activation code for Mervis services, start by following this guide. Enter your login and password for Mervis DB and the Proxy ID - both can be found on the Unipi.Technology webpage.
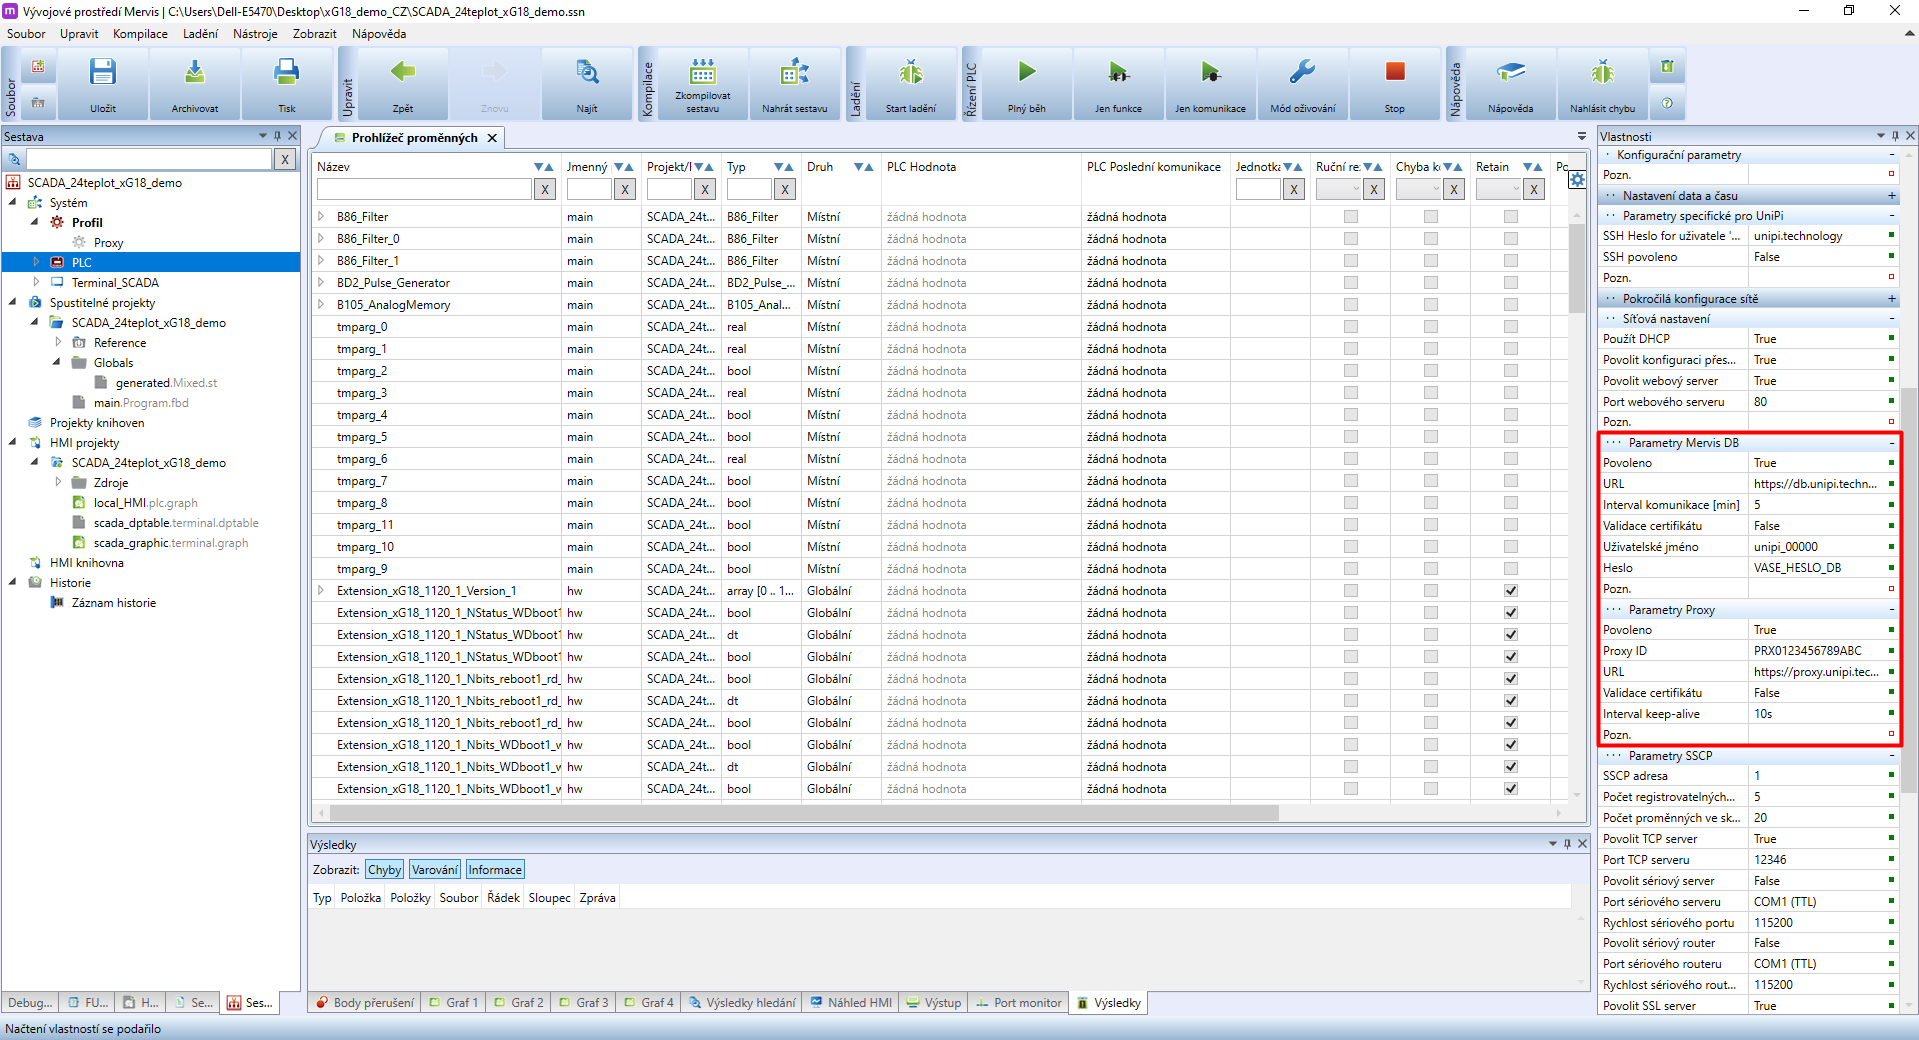
Mervis DB is designed for long-term (cloud) data storage and is utilized mainly by the Mervis SCADA service. Mervis Proxy then serves for remote and secure connection to PLCs, be it a connection through Mervis SCADA (which is then able to read to and write from variables for control and monitoring of programs on PLCs), or from the Mervis IDE for uploading, debugging and controlling programmes.
To better understand Mervis DB, Mervis Proxy and their configurations you can check the following tutorials containing all important settings. This configuration is already included in the downloadable project.
As the previous steps changed the PLC configuration (which is not uploaded along with the solution), you need to upload it. In the left panel right-click on PLC and select:
PLC Operations → PLC Settings → Upload configuration
If you are unsure what to do, check out the Uploading a RunTime configuration guide.

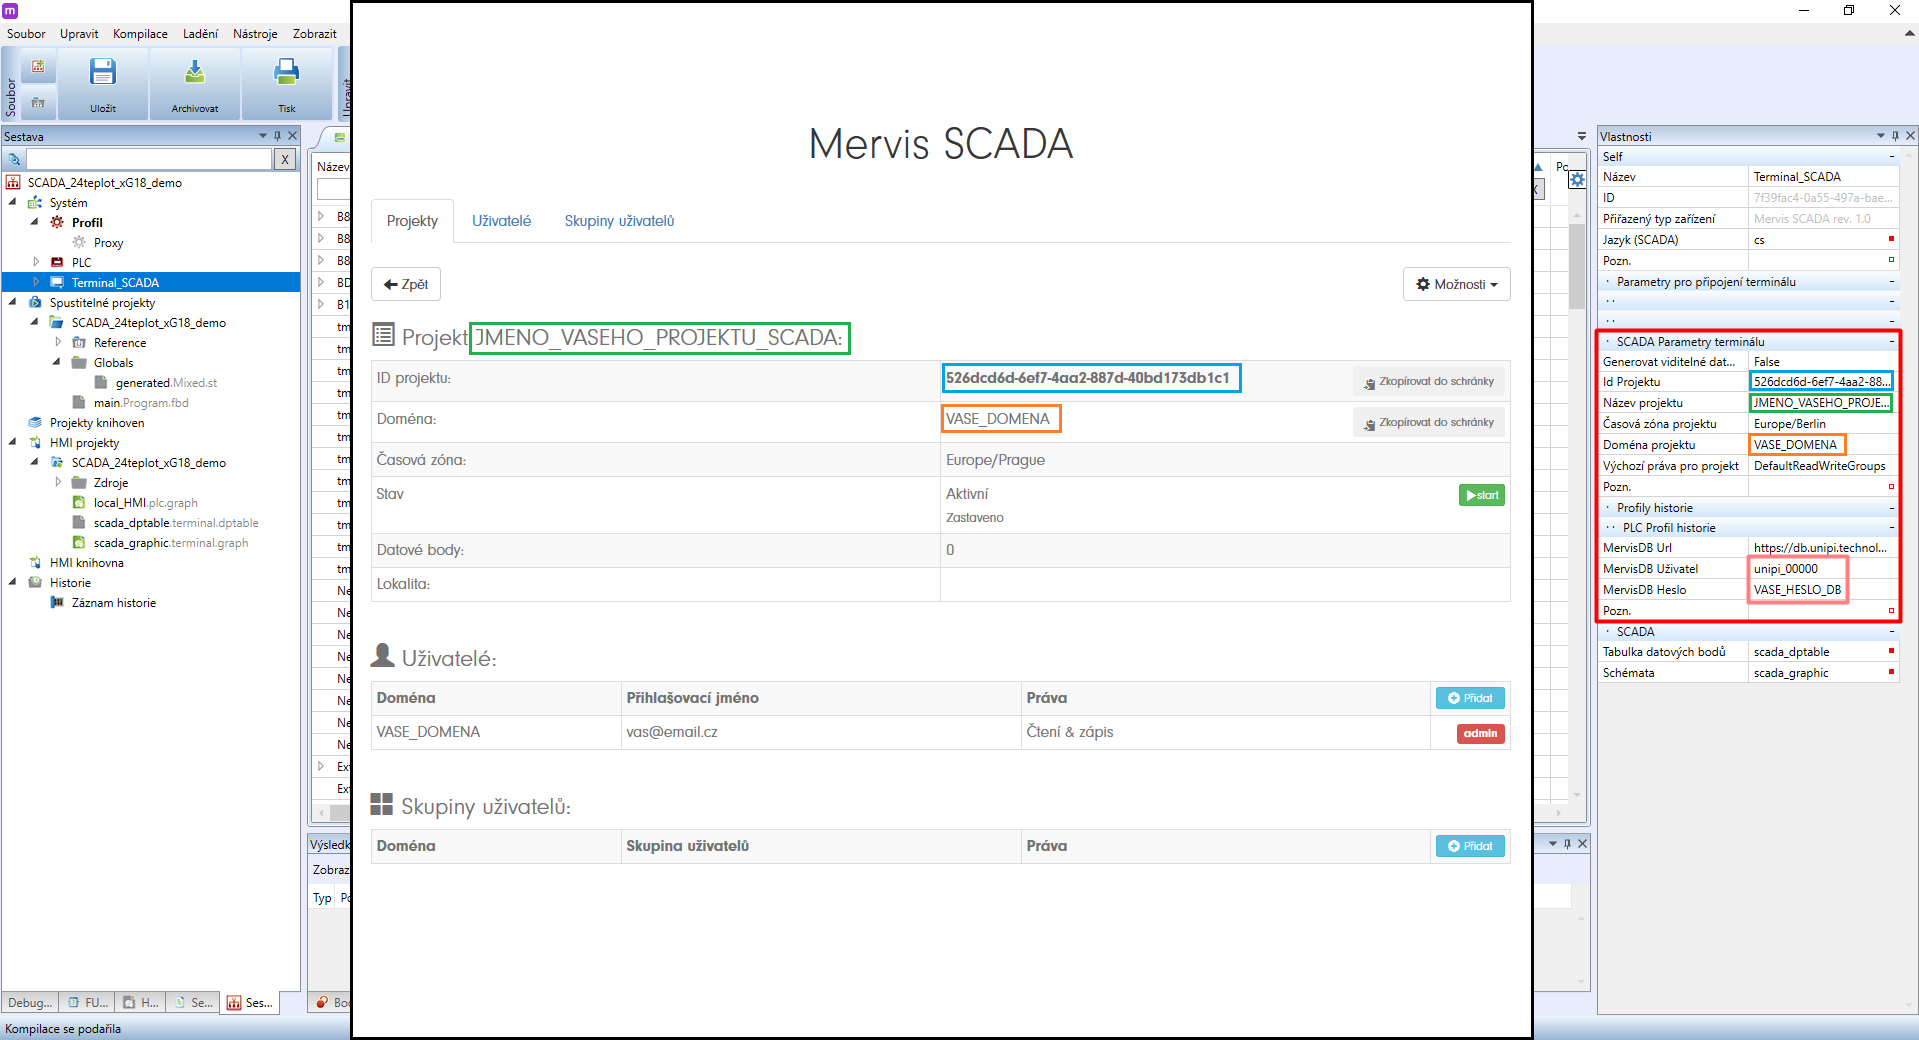
Now click on Terminal_SCADA. In the right panel, a list of the terminal's properties will display. Enter the same data as in the properties of the SCADA project you created in the customer portal. Open the customer portal and display the SCADA project you created earlier.
Set the terminal parameters in Mervis IDE to the following:
- Project ID: Copy the ID from the SCADA project detail
- Project name: Copy the name from the SCADA project detail
- Timezone: Set to the same value as in the SCADA project
- Project domain: Copy the domain from the SCADA project detail
- URL Mervis DB: leave at https://db.unipi.technology/dbaccess
- Mervis DB User and Mervis DB Password: set the same info as on Unipi.Technology
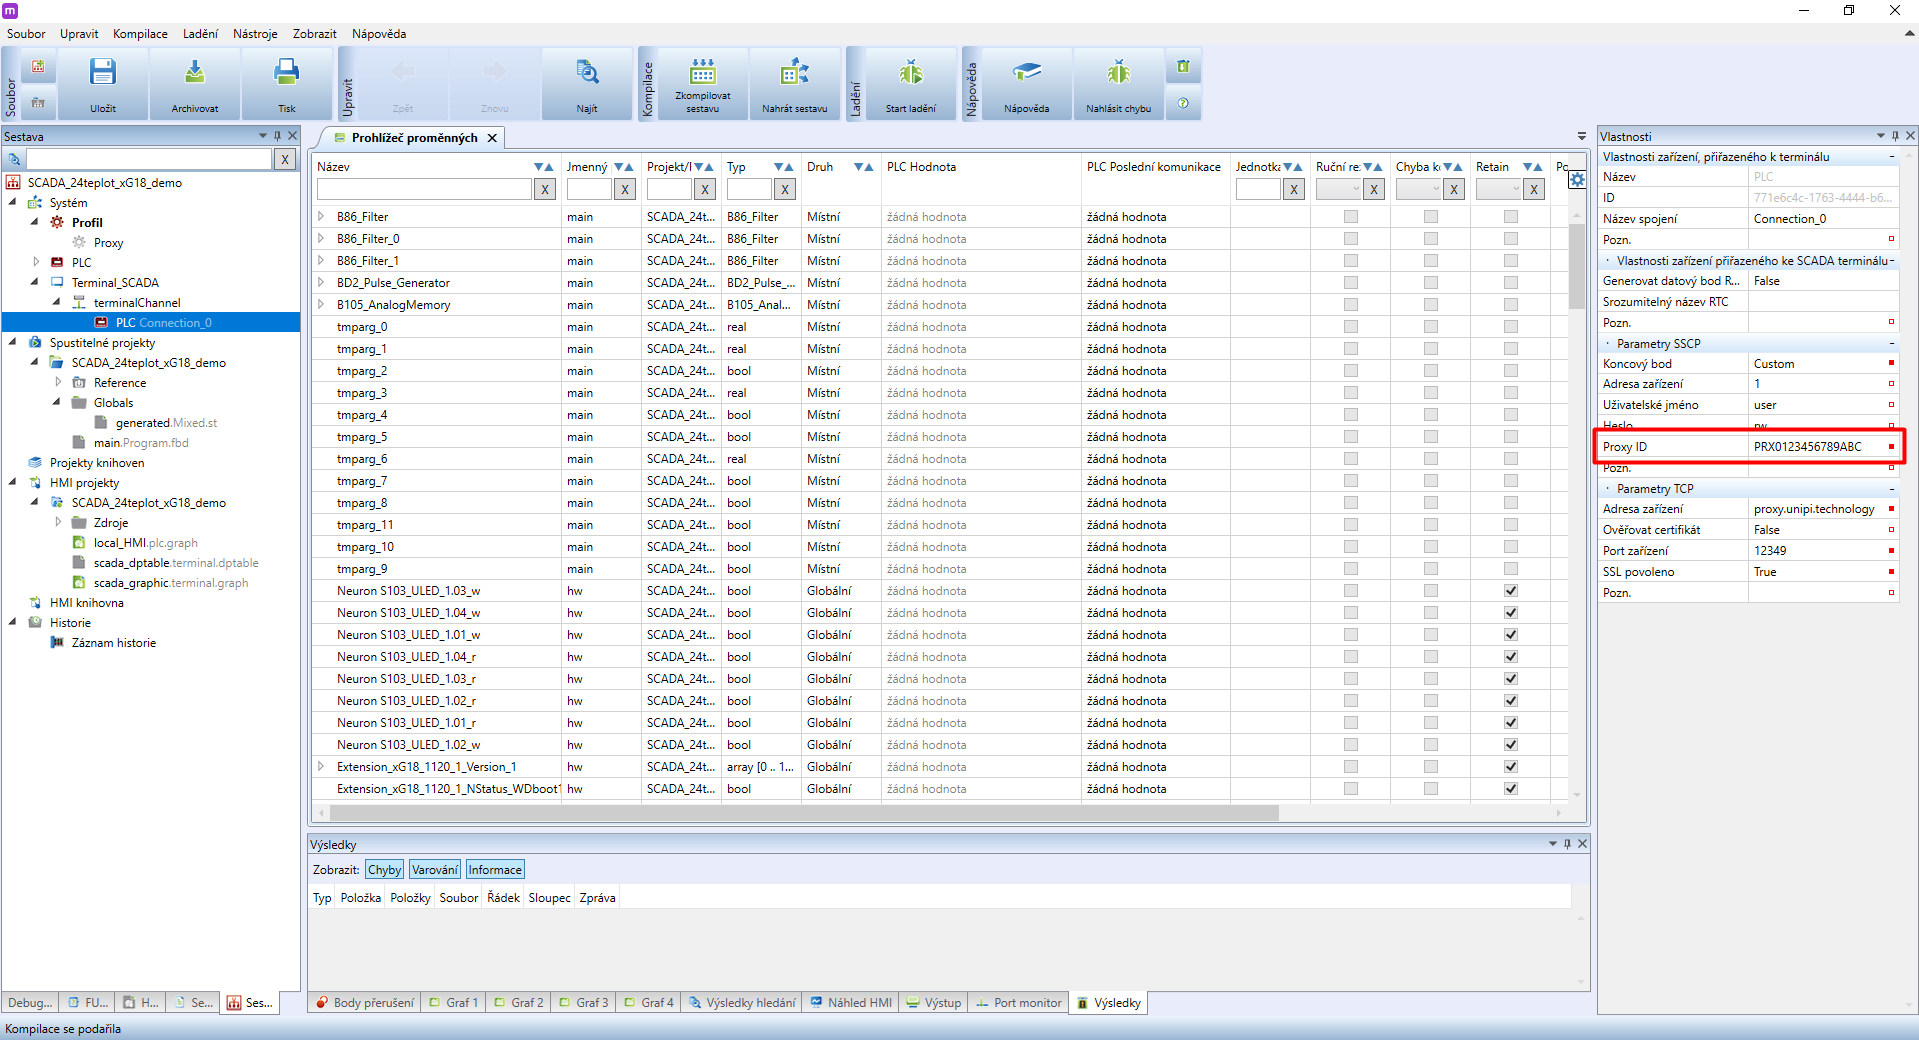
Now click on the PLC assigned to the SCADA terminal. In the SSCP Parameters section edit the parameters as follows:
- Set the same Proxy ID as in your Unipi customer account.
- other parameters of this project are already set
Uploading the project and SCADA definition
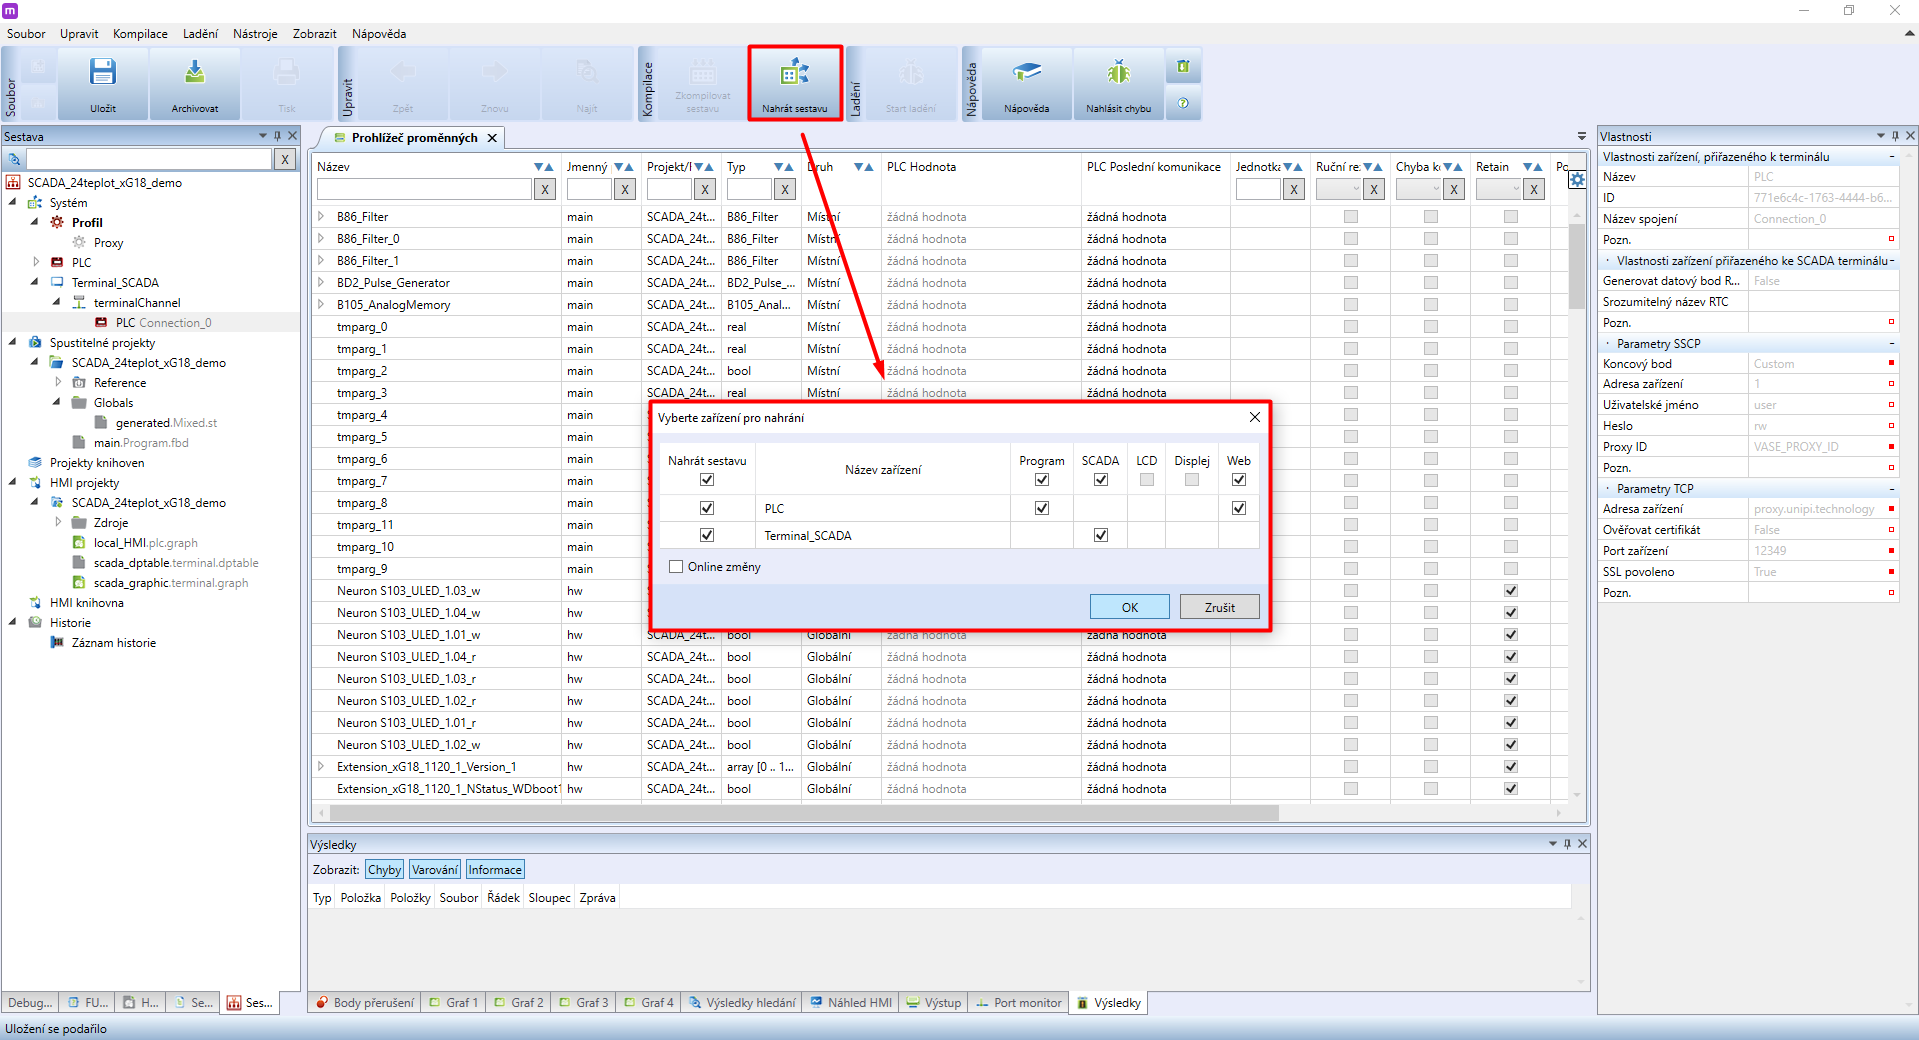
If you have everything set according to the previous steps, click on Deploy solution. After that check, if all available fields are marked in order to upload the program, the local web and also to create Mervis SCADA definition.
Continue by Chapter 4 of the Creating a Mervis SCADA project tutorial to upload the Mervis SCADA definition created in the previous step.
Useful tips
- Before deployment, you also need to set PLC login, password and some parameters for a secure connection. Follow this guide: Securing the controller.
- If you wish to connect to the PLC from outside of the local network (eg. from any place with internet connectivity), it is necessary for the PLC to have Mervis Proxy set and be connected to the internet. Open the uploaded program in Mervis IDE and search for Profiles in the upper part of the left panel. Double-click on Proxy to activate the profile for connection through a proxy we created for you previously.
Note: Before any adjustments in the program or the configuration you need to switch back to the main profile by double-clicking on it. The selection is indicated by Proxy becoming grey. Re-activate the Proxy profile before remote deployment of the program and disable it again afterwards.
- The project also contains a program that signals an error or sensor disconnection. The entire program is created in main.program.fbd including comments.
Advantages
- Each sensor connected to Extension xG18 can be swapped with another without the need to edit the program. If the program is set accordingly, the swap can be performed on the run.
- Easy system connection due to RS485 module bus topology and sensors with RJ45 connectors for connecting to Extension xG18.
- The PLC can be easily programmed or debugged both locally and remotely through Mervis Proxy.
- The project is implemented in Mervis SCADA cloud service and is suitable for use in monitoring centres which do not require to be in the same location.