Table of Contents

Installation guides for older systems

Node-RED for Unipi Axon (OLD)

This manual will guide you through the entire process of installing Node-RED into your Axon unit. Before the installation please make sure your unit was delivered undamaged and without any visible defects.

Axon

To install Node-RED you need to re-flash the current OS in the unit by a new one. This specific OS containing preinstalled Node-RED software is available in the OS images, chapter Axon Node-RED OS. Download it and extract it into a new folder in your PC.

Flashing OS using the service web interface

Flashing OS via the service interface on Axon units can be performed in three ways:

1) In a local network (with DHCP):

  1. Connect the unit to your local network, plug in the power supply and wait at least for a minute before the unit boots and gets an IP address from DHCP. After that unplug the power supply
  2. Press and hold the Service button located (with exceptions) in the upper row of the connector labels to the left from USB port labels
  3. Plug in the power supply. After few moments the unit will switch to the service mode indicated by the slow flashing of all diodes in section 1 (except PWR and RUN)
  4. Now you can release the Service button.
  5. You now need to get the unit's IP address. You can obtain it either from the DHCP server or using a suitable application such as Advanced IP Scanneruser manual

2) Direct connection to the unit (without DHCP):

  1. Connect to the unit using a network cable (RJ45)
  2. Press and hold the Service button located (with exceptions) in the upper row of the connector labels to the left from USB port labels
  3. Plug in the power supply. After few moments the unit will switch to the service mode indicated by the slow flashing of all diodes in section 1 (except PWR and RUN)
  4. Now you can release the Service button.
  5. Set the PC's IP address to 192.168.200.100, mask 255.255.255.0
  6. The Axon's IP is now set to 192.168.200.200

3) Via a Wi-Fi hotspot

  1. Press and hold the Service button located (with exceptions) in the upper row of the connector labels to the left from USB port labels
  2. Plug in the power supply. After few moments the unit will switch to the service mode indicated by the slow flashing of all diodes in section 1 (except PWR and RUN)
  3. Now you can release the Service button.
  4. Connect to Wi-Fi network with SSID: UNIPICONFIG, using unipi.technology as password. Wait until your unit obtains an IP address from the DHCP server running in the unit
  5. The Axon's IP is now set to 192.168.201.1

Next steps:

  1. Enter the unit's IP address into your web browser. After confirmation, the Axon service interface will display
  2. Drag the archive.swu file from the OS image archive and drop it into the Software dialogue window
  3. Wait until the unit finishes the entire process. You can monitor its progress in the Messages dialogue window
  4. The unit will automatically reboot

Flashing the OS using USB flash disk

  1. Prepare a USB flash disk with a capacity of at least 2 GB and a FAT32 partition
  2. Copy the whole content of the ZIP archive to the flash disk
  3. Insert the flash disk into the unit's USB2 port
  4. Press and hold the reset button located next to the upper row of connector labels
  5. The unit will automatically start the reflashing process, indicated by progressive blinking of LEDs. You can now release the reset button
  6. Once the LEDs stop blinking the reflash is completed. After that, the Axon will automatically reboot to its normal state

(!)

Attention:
Only the USB2 port can be used for reflashing!

(i)

Note:
In case the used flash disk is not compatible, Axon will boot to the Service mode and the progressive blinking of LEDs is not indicated. In this case it necessary to use different flash disk or the above mentioned Service web interface.

Pre-installed SW

The OS image you just uploaded into your unit also contains the preinstalled EVOK open-source software - an Unipi-developed application programming interface (API) for direct communication with Unipi hardware.

Also available is a practical demonstration of using the API in the form of a simple web application (Unipi Control Panel) serving as a user interface for all inputs and outputs on the unit. To access this interface, open your web browser and enter the IP address of your unit with the port number :80. Port number is optional, as it is the default webserver port.

For example:

192.168.1.10

or

192.168.1.10:80

The application's interface looks like this:

Another software included in the disk image, which is now also uploaded in your unit, is Node-RED. It is an open-source programming tool for connecting hardware devices, various APIs or online services. In this case, the Node-RED software already contains the EVOK API. This API is represented by a pair of nodes in the left panel, section Unipi - unipi input and unipi output made to control both analog and digital inputs and outputs.

Connecting to the Node-RED interface

To access the Node-RED programming interface, open a web browser and enter the unit's IP address into the address tab. Don't forget to add the :1880 port number.

For example:

192.168.1.10:1880

The following interface will appear:

You have probably noticed the interface already contains a project. It is a demonstration project for reading inputs and writing to outputs, which is connected with a web user interface → so-called Dashboard. This project (flow) is available for download at the end of the article.

To access the interface, add /ui suffix behind the address with the port number.

For example:

192.168.1.10:1880/ui

The following interface will appear:

You now have everything you need to create your projects.

Node-RED security

If you did not set up login using the following guide, you expose yourself to a risk of unauthorized access to the Unipi unit. That may lead to potentially dangerous changes resulting in downtimes or limitations. At the worst, unauthorized tampering can damage connected technologies or endanger personnel at installation sites.

That said, it is very important to have your system secured every time you create a new project.


As you will communicate with the unit using the SSH protocol, you need to know the unit's IP address and to have an SSH client installed on your unit. Among the most frequently used programs is the PuTTy application - if you don't have it already, follow this guide.

(i)

Note:
For transfer files between your PC and the Unipi unit you can use the WinSCP utility. Login is the same as for SSH.

After that, just follow this guide on the official Node-RED webpage.

Downloadable projects

Node-RED projects are called flows. On the link below you can download a file with a flow for Unipi Patron / Neuron / Axon units.

default-flow_axon-neuron.zip

Node-RED for Unipi Edge

This manual will guide you through the entire process of installing Node-RED into your Edge unit.

On Unipi Edge, the Base OS is pre-installed as a default SW. This system does not include Node-RED, but it is possible to install Node-RED on to prepared OS.

(!)

Note:
This article contains installation of Node-RED with API Evok. Evok is not a mandatory part of the installation, but it can simplify the access to I/O on Unipi Edge. Evok can be omitted, if access to I/O is not needed.

(!)

Note:
To make sure you have the latest version of Base OS, upload the OS according to the Upload/backup OS guide. Image with Base OS can be found in OS images section under Unipi Edge.

Installing

To introduce Node-RED at least these packages and their dependencies are needed:

  • Evok
  • Node-RED

Connect via SSH

First step is to connect to the unit via SSH. This can be done with terminal emulator for example PuTTy.

Installing Evok

To communicate with I/O in Node-RED we will use the Evok API. Guide how to install Evok can be found here.

Installing Node-RED

Guide how to install Node-RED can be found here. Before running the script, make sure the package list was updated.

sudo apt update

(!)

Attention:
It is very important to have your system secured every time you create a new project.

To secured the Node-RED follow this guide on the official webpage.

After the installation, it is possible to enable automatic Node-RED start after boot. If you enabled this feature, restart the unit to start the Node-RED.

sudo reboot

(!)

Tip:
OS with Node-RED can be saved and copied with backup and upload to another unit. With this you can avoid installation and setup of Node-RED on every unit separately.

Connecting to Node-RED interface

To enter the Node-RED programming interface, open a web browser and enter the IP address or mDNS record to the browser's address bar and add :1880 port.

An example:

http://e410-sn1253701234:1880

The following interface will be displayed:

Add packages from library

For easier work with system, I/O and other interfaces, it is possible to add existing node to pallet in programming interface. To add nodes into Node-RED pallet from library follow the official guide.

To work with Evok we will add this package: @unipitechnology/node-red-contrib-unipi-evok.

(!)

Attention:
There are multiple versions of nodes in this package. Always use the newest version of node!

Node-RED for Unipi Gate (OLD)

This manual will guide you through the entire process of installing Node-RED into your Unipi Gate.

Gate

On Unipi Gate, the Node-RED is pre-installed as a default SW, making re-flashing of the original system unnecessary. Base Os is preinstalled. However, if you want to be sure you have the latest version, upload the OS according to the guide below. OS image with the preinstalled Node-RED SW is available in OS images archive section, chapter Gate Node-RED OS. Download it and extract it into a new folder in your PC.

Flashing the OS using the service interface

To upload OS into the Unipi Gate through its service interface, you need to access the service mode first. To enable it, follow instructions in this article.

  1. Enter the device's IP address into a web browser. Upon confirmation, you will be connected to the Unipi Gate service interface
  2. In the service interface, drag and drop the archive.swu file extracted from the OS image archive into the Software update dialogue window
  3. The flashing process is indicated by rapid blinking of ACT, TX and RX diodes (demonstration here)
  4. Wait until the device finishes the process. Its progress can be monitored in a dialogue window under the Messages label
  5. Finishing the process is indicated by diodes going off and a reboot of the device

Flashing the OS using a USB flashdisk

  1. Prepare a USB flash disk in FAT32 format with a capacity of at least 2 GB
  2. Copy the content of the ZIP archive onto the flash disk
  3. Unplug the power supply from the device and insert the flash disk into the device's USB port
  4. Press and hold the SERVICE button on the device's face side
  5. Plug the power supply back. Unipi Gate will automatically start the OS flashing process indicated by rapid blinking of ACT, TX and RX diodes (demonstration here)
  6. You can now release the SERVICE button
  7. Finishing the process is indicated by diodes going off and a reboot of the device

(i)

Note:
If the USB flash disk is not compatible, Unipi Gate will not start the OS flashing and reboots. In that case, you need to use a different flash disk or the above-mentioned flashing through the service interface.

Pre-installed SW

The OS image you just uploaded into your device contains pre-installed Node-RED software. It is an open-source programming tool for interconnecting hardware devices, various APIs or online services.

Connecting to Node-RED interface

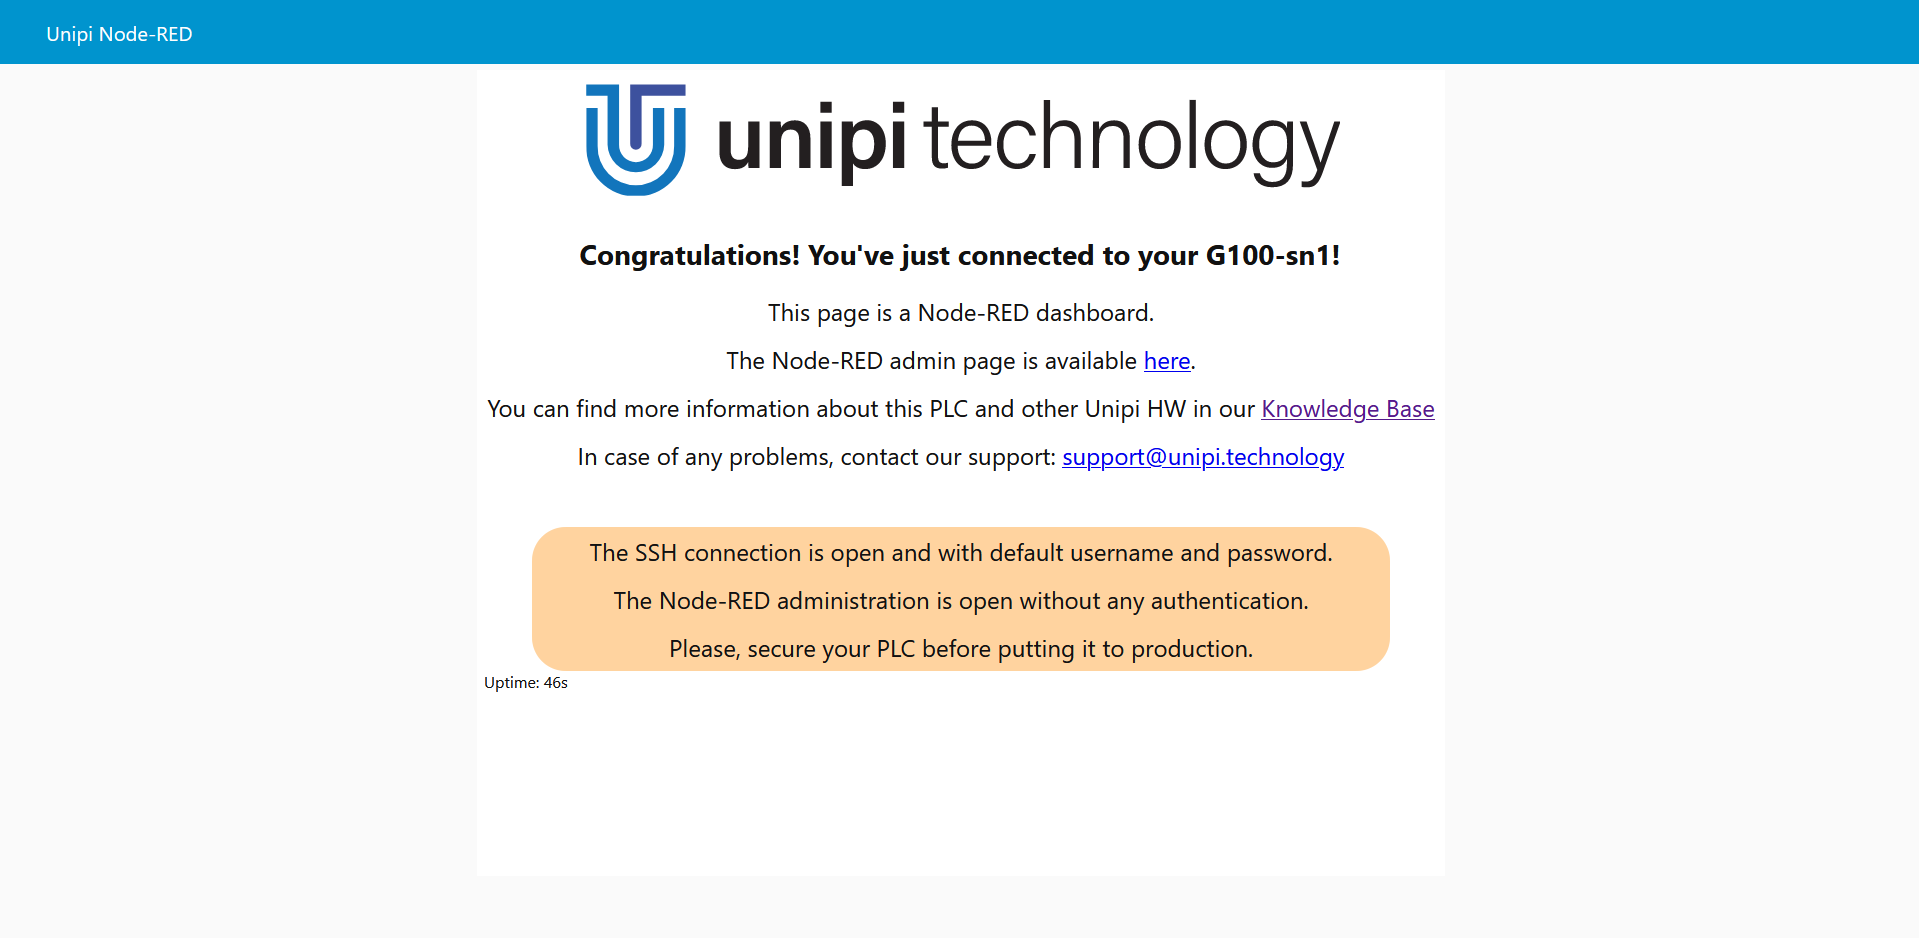
To access the Node-RED user interface (so-called dashboard), open a web browser and enter the IP address or mDNS address to the browser's address bar.

Such as:

http://g100-sn1

The following interface will appear:

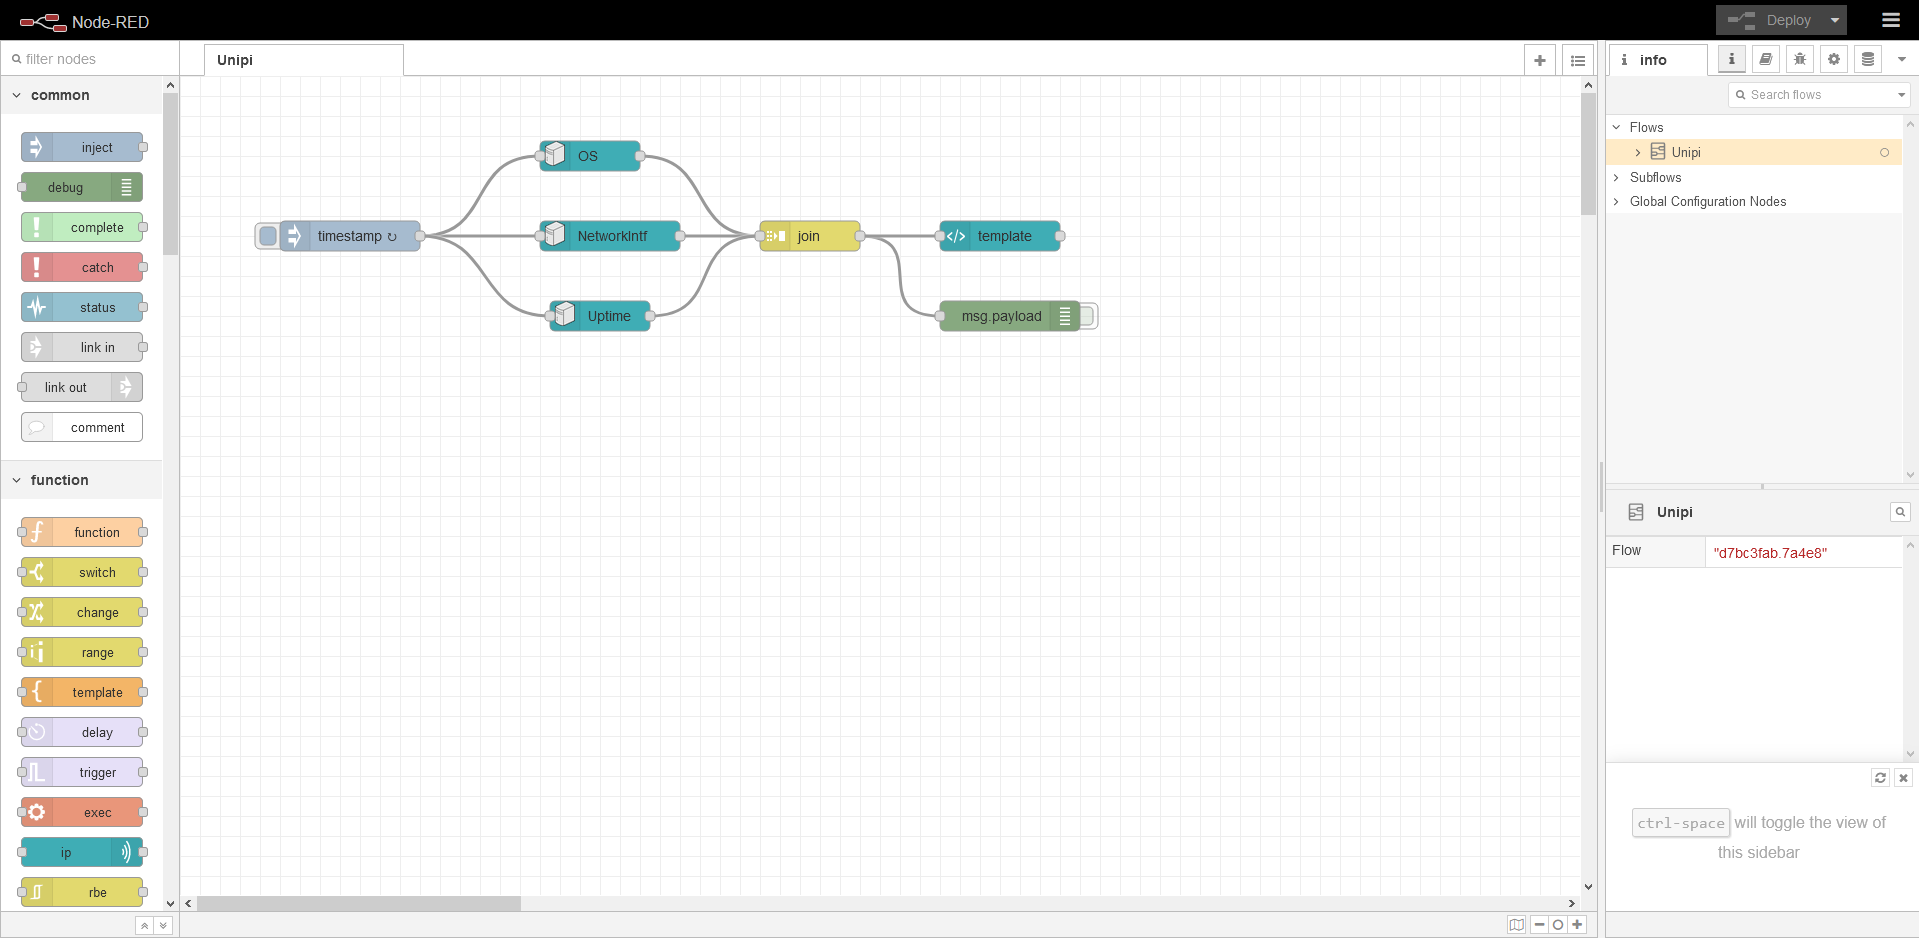
To enter the Node-RED programming interface, add :1880 port to the IP or mDNS address.

An example:

http://g100-sn1:1880

The following interface will be displayed:

As seen in the picture, the programming interface already contains a demonstration project. This project serves only to create a user interface and is included in each Node-RED OS images provided for Unipi Gate.

Securing the OS (SSH)

(!)

Attention:
Securing the operating system is always needed to prevent unauthorized access to the Unipi units. Using a non-secured OS may lead to unauthorized tampering that can stop or limit the system's operation. In the worst-case scenario, it may also cause damage to the connected technologies or endanger personnel on the installation site.

For these reasons, it is important to properly secure the system each time a new project is created. Alternatively, you can disable the SSH access completely.


As the connection is provided by the SSH protocol, it is necessary to know the IP address or the mDNS address of the device and have an SSH client installed on your PC or tablet. Among the most frequently used clients for Windows OS is the PuTTY application - user guide and default passwords are available here.

Before continuing, make sure you are logged in as the right user (for example “unipi” on our Base OS). You can verify this by whoami command.

unipi@S103-sn999:~$ whoami
unipi

Now letps proceed to change the password by entering the following command:

passwd

A prompt to enter and confirm the current and new password will be displayed. If everything is set correctly, the following message will appear:

Changing password for unipi.
Current password:
New password:
Retype new password:

The entire process is depicted below (the password is not visible during its entering):

unipi@S103-sn999:~$ passwd
Changing password for unipi.
Current password:
New password:
Retype new password:
passwd: password updated successfully


Was the password change unsuccessful?
If the password change fails, the following message will appear:

passwd: Authentication token manipulation error
passwd: password unchanged

To solve this issue, try to enter the command below and then repeat the password change process.

sudo mount -rw -o remount /

Next, it's good practice to sync the changes on the storage (eMMC or SD card). This can be achieved by the sync command:

unipi@S103-sn999:~$ sync

You can now logout from your SSH session, reboot the PLC or power it of and on and login back to verify that the password has been sucesfully changed.

If the password cannot be changed even after entering the command, please contact our technical support.

Node-RED security

If you did not set up login using the following guide, you expose yourself to a risk of unauthorized access to the Unipi unit. That may lead to potentially dangerous changes resulting in downtimes or limitations. At the worst, unauthorized tampering can damage connected technologies or endanger personnel at installation sites.

That said, it is very important to have your system secured every time you create a new project.


As you will communicate with the unit using the SSH protocol, you need to know the unit's IP address and to have an SSH client installed on your unit. Among the most frequently used programs is the PuTTy application - if you don't have it already, follow this guide.

(i)

Note:
For transfer files between your PC and the Unipi unit you can use the WinSCP utility. Login is the same as for SSH.

After that, just follow this guide on the official Node-RED webpage.

Node-RED for Unipi Neuron (OLD)

This manual will guide you through the entire process of installing Node-RED into your Neuron unit. Before the installation please make sure your unit was delivered undamaged and without any visible defects.

Neuron

SD card preparation

We strongly recommend using industrial SD cards. If you use a laptop, bear in mind most laptops do not feature a microSD card slot and will require a suitable SD or USB adapter. A suitable card can be purchased on the Unipi e-shop.

For a smooth running of Node-RED on Unipi Neuron or Unipi 1.1 units, you will need a card with a capacity of at least 4 GB.

Detecting the unit's IP address

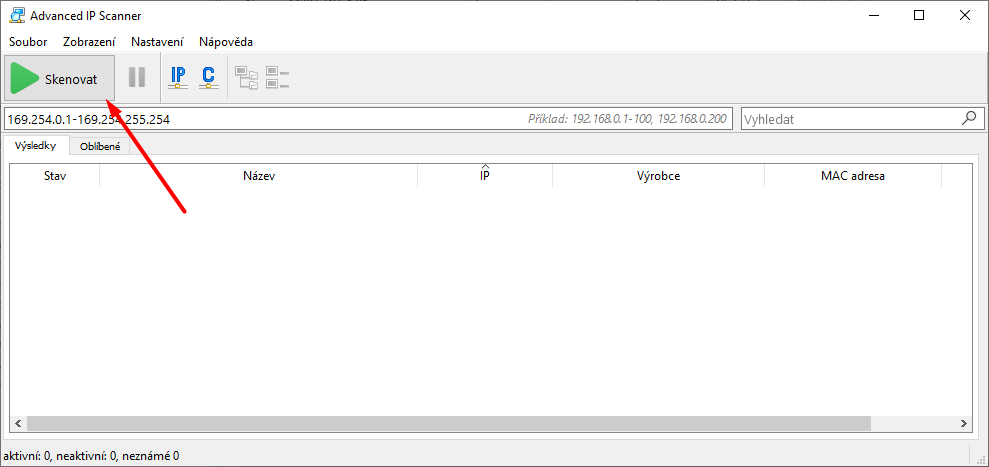
To detect the unit's IP address you can use any of the available LAN network scanning tools. You can also gain the IP address from the DHCP server (if you have access to it). For this tutorial, we selected the Advanced IP Scanner program.

Download and install it, or just launch it. The Advanced IP Scanner interface looks like the following:

For automatic network selection, click on the icon to start detection of all available networks on all available adapters of the PC. The specific range can be adjusted manually.

For network scan click on the button.

Scanning local networks will take a couple of minutes. Please wait until your device is displayed.

Remember the IP address - you will need it later when working with the unit.

Pre-installed SW

The OS image you just uploaded into your unit also contains the preinstalled EVOK open-source software - an Unipi-developed application programming interface (API) for direct communication with Unipi hardware.

Also available is a practical demonstration of using the API in the form of a simple web application (Unipi Control Panel) serving as a user interface for all inputs and outputs on the unit. To access this interface, open your web browser and enter the IP address of your unit with the port number :80. Port number is optional, as it is the default webserver port.

For example:

192.168.1.10

or

192.168.1.10:80

The application's interface looks like this:

Another software included in the disk image, which is now also uploaded in your unit, is Node-RED. It is an open-source programming tool for connecting hardware devices, various APIs or online services. In this case, the Node-RED software already contains the EVOK API. This API is represented by a pair of nodes in the left panel, section Unipi - unipi input and unipi output made to control both analog and digital inputs and outputs.

Connecting to the Node-RED interface

To access the Node-RED programming interface, open a web browser and enter the unit's IP address into the address tab. Don't forget to add the :1880 port number.

For example:

192.168.1.10:1880

The following interface will appear:

You have probably noticed the interface already contains a project. It is a demonstration project for reading inputs and writing to outputs, which is connected with a web user interface → so-called Dashboard. This project (flow) is available for download at the end of the article.

To access the interface, add /ui suffix behind the address with the port number.

For example:

192.168.1.10:1880/ui

The following interface will appear:

You now have everything you need to create your projects.

Node-RED security

If you did not set up login using the following guide, you expose yourself to a risk of unauthorized access to the Unipi unit. That may lead to potentially dangerous changes resulting in downtimes or limitations. At the worst, unauthorized tampering can damage connected technologies or endanger personnel at installation sites.

That said, it is very important to have your system secured every time you create a new project.


As you will communicate with the unit using the SSH protocol, you need to know the unit's IP address and to have an SSH client installed on your unit. Among the most frequently used programs is the PuTTy application - if you don't have it already, follow this guide.

(i)

Note:
For transfer files between your PC and the Unipi unit you can use the WinSCP utility. Login is the same as for SSH.

After that, just follow this guide on the official Node-RED webpage.

Downloadable projects

Node-RED projects are called flows. On the link below you can download a file with a flow for Unipi Patron / Neuron / Axon units.

default-flow_axon-neuron.zip

Node-RED for Unipi Patron (OLD)

This manual will guide you through the entire process of installing Node-RED into your Patron unit. Before the installation please make sure your unit was delivered undamaged and without any visible defects.

Patron

To install Node-RED you need to re-flash the current OS in the unit by a new one. This specific OS containing preinstalled Node-RED software is available in the OS images, chapter Patron Node-RED OS. Download it and extract it into a new folder in your PC.
Flashing the OS using the service interface

To upload OS into the Patron unit through its service interface, you need to access the service mode first. To enable it, follow instructions in this article.

  1. Enter the device's IP address into a web browser. Upon confirmation, you will be connected to the Unipi Patron service interface
  2. In the service interface, drag and drop the archive.swu file extracted from the OS image archive into the Software update dialogue window
  3. The OS flashing will start, indicated by rapid blinking of all LEDs in both upper and lower row on section 1
  4. Wait until the device finishes the process. Its progress can be monitored in a dialogue window under the Messages label
  5. Finishing the process is indicated by diodes going off and a reboot of the device

Flashing the OS using a USB flashdisk

  1. Prepare a USB flash disk in FAT32 format with a capacity of at least 2 GB
  2. Copy the content of the ZIP archive onto the flash disk
  3. Unplug the power supply from the device and insert the flash disk into any device's USB port
  4. Press and hold the SERVICE button
  5. Plug in the device's power supply, the unit will automatically start the reflashing process indicated by rapid blinking of all LEDs in both upper and lower row on section 1
  6. You can now release the SERVICE button
  7. Finishing the process is indicated by diodes going off and a reboot of the device

(i)

Note:
If the USB flash disk is not compatible, the unit will not start the OS flashing and reboots. In that case, you need to use a different flash disk or the above-mentioned flashing through the service interface.

Pre-installed SW

The OS image you just uploaded into your unit also contains the preinstalled EVOK open-source software - an Unipi-developed application programming interface (API) for direct communication with Unipi hardware.

Also available is a practical demonstration of using the API in the form of a simple web application (Unipi Control Panel) serving as a user interface for all inputs and outputs on the unit. To access this interface, open your web browser and enter the IP address of your unit with the port number :80. Port number is optional, as it is the default webserver port.

For example:

192.168.1.10

or

192.168.1.10:80

The application's interface looks like this:
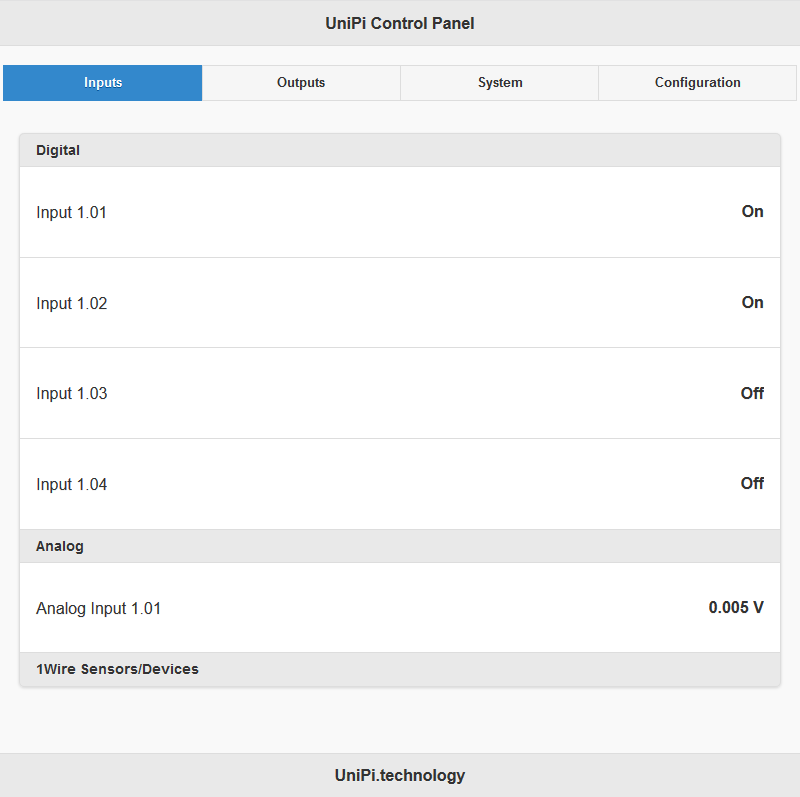
Another software included in the disk image, which is now also uploaded in your unit, is Node-RED. It is an open-source programming tool for connecting hardware devices, various APIs or online services. In this case, the Node-RED software already contains the EVOK API. This API is represented by a pair of nodes in the left panel, section Unipi - unipi input and unipi output made to control both analog and digital inputs and outputs.
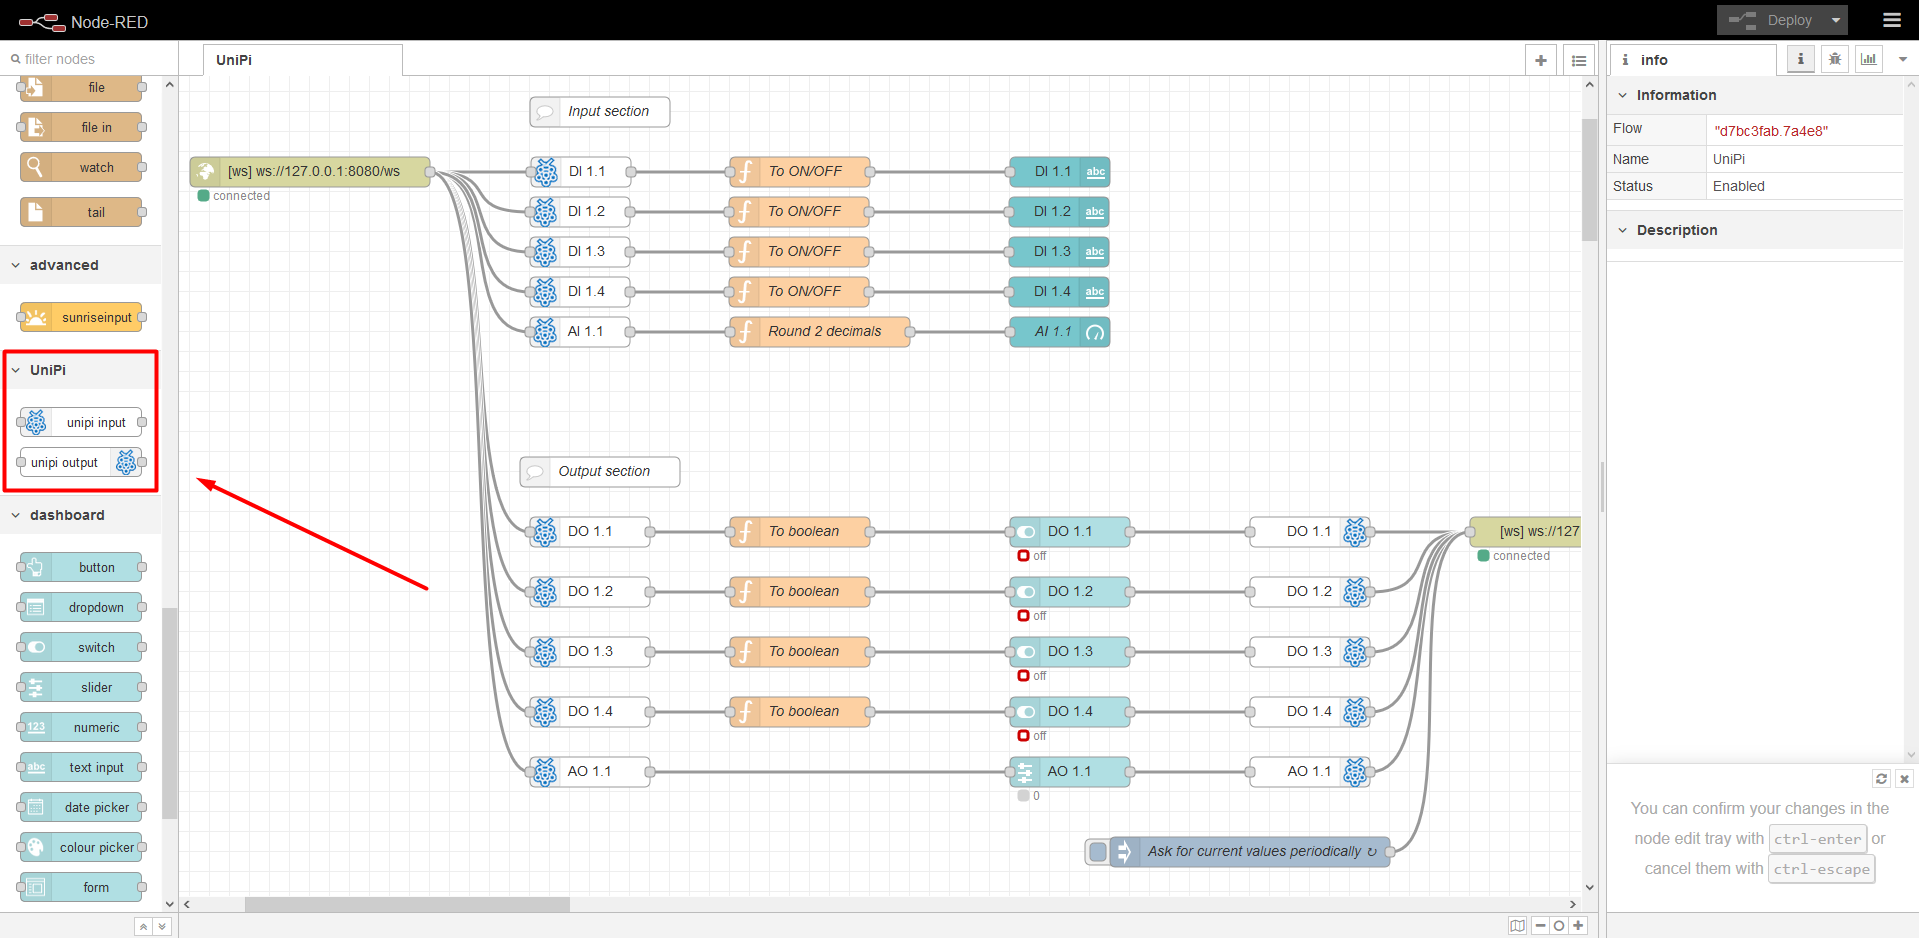
Connecting to the Node-RED interface

To access the Node-RED programming interface, open a web browser and enter the unit's IP address into the address tab. Don't forget to add the :1880 port number.

For example:

192.168.1.10:1880

The following interface will appear:
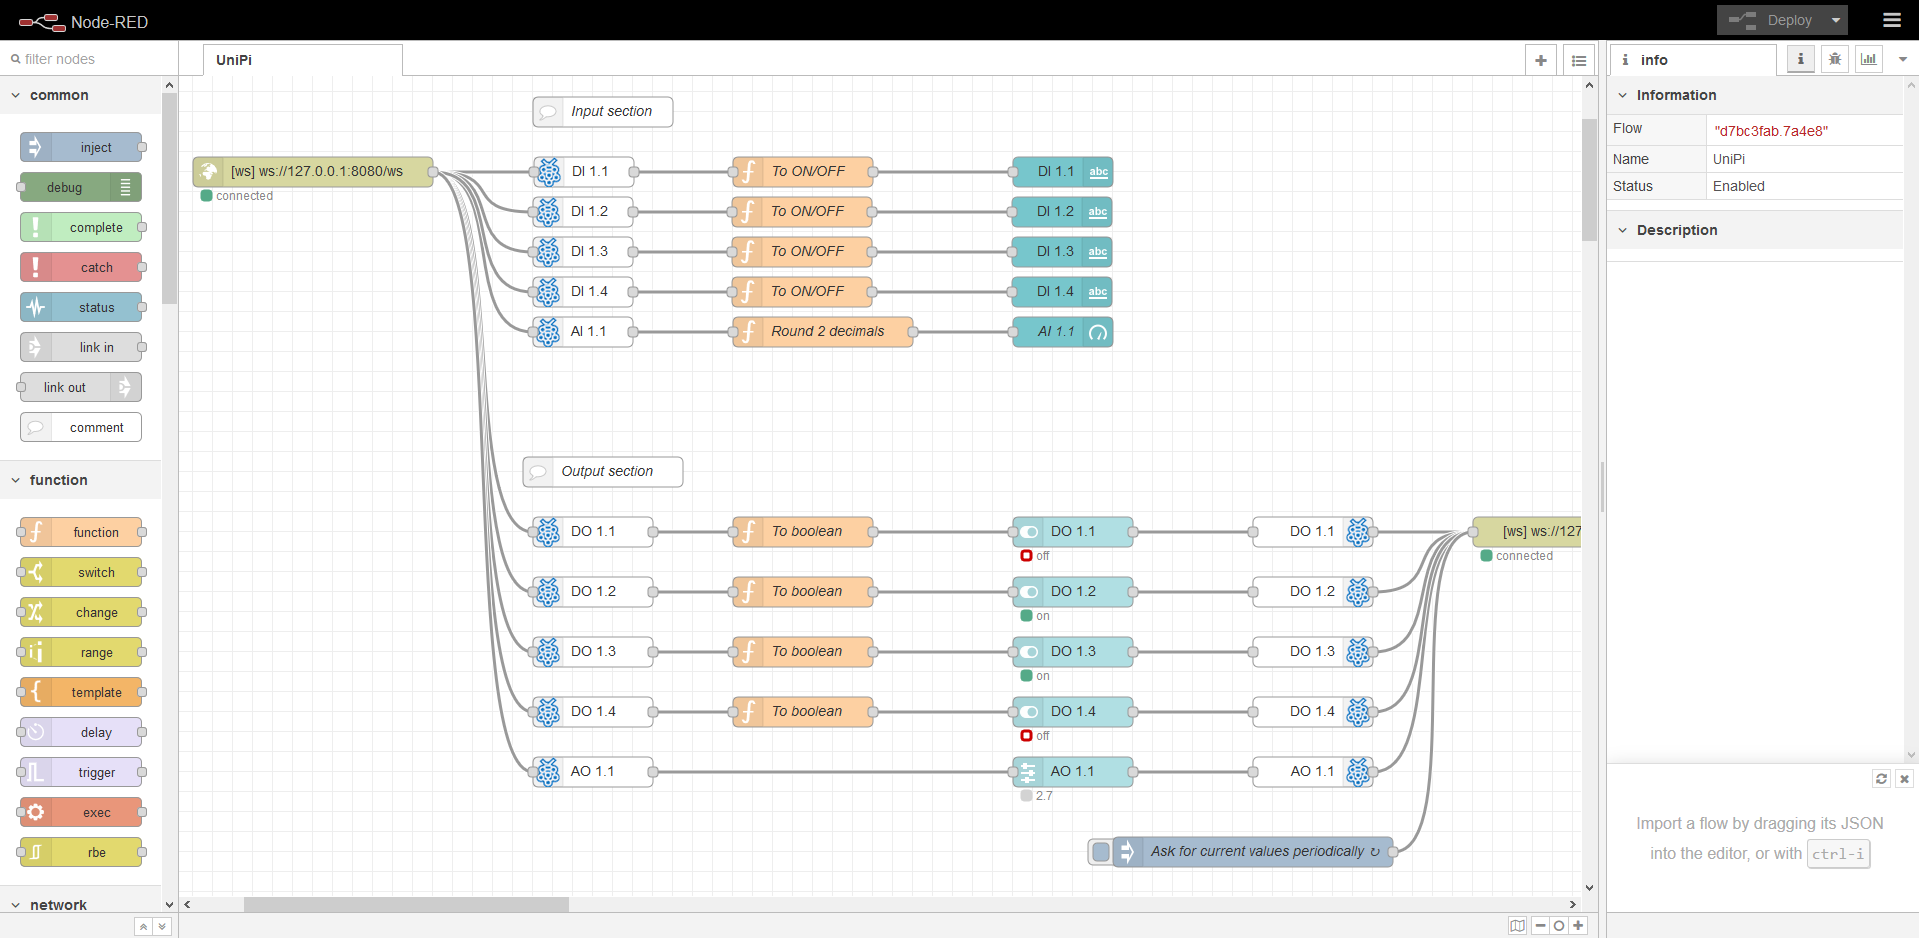
You have probably noticed the interface already contains a project. It is a demonstration project for reading inputs and writing to outputs, which is connected with a web user interface → so-called Dashboard. This project (flow) is available for download at the end of the article.

To access the interface, add /ui suffix behind the address with the port number.

For example:

192.168.1.10:1880/ui

The following interface will appear:
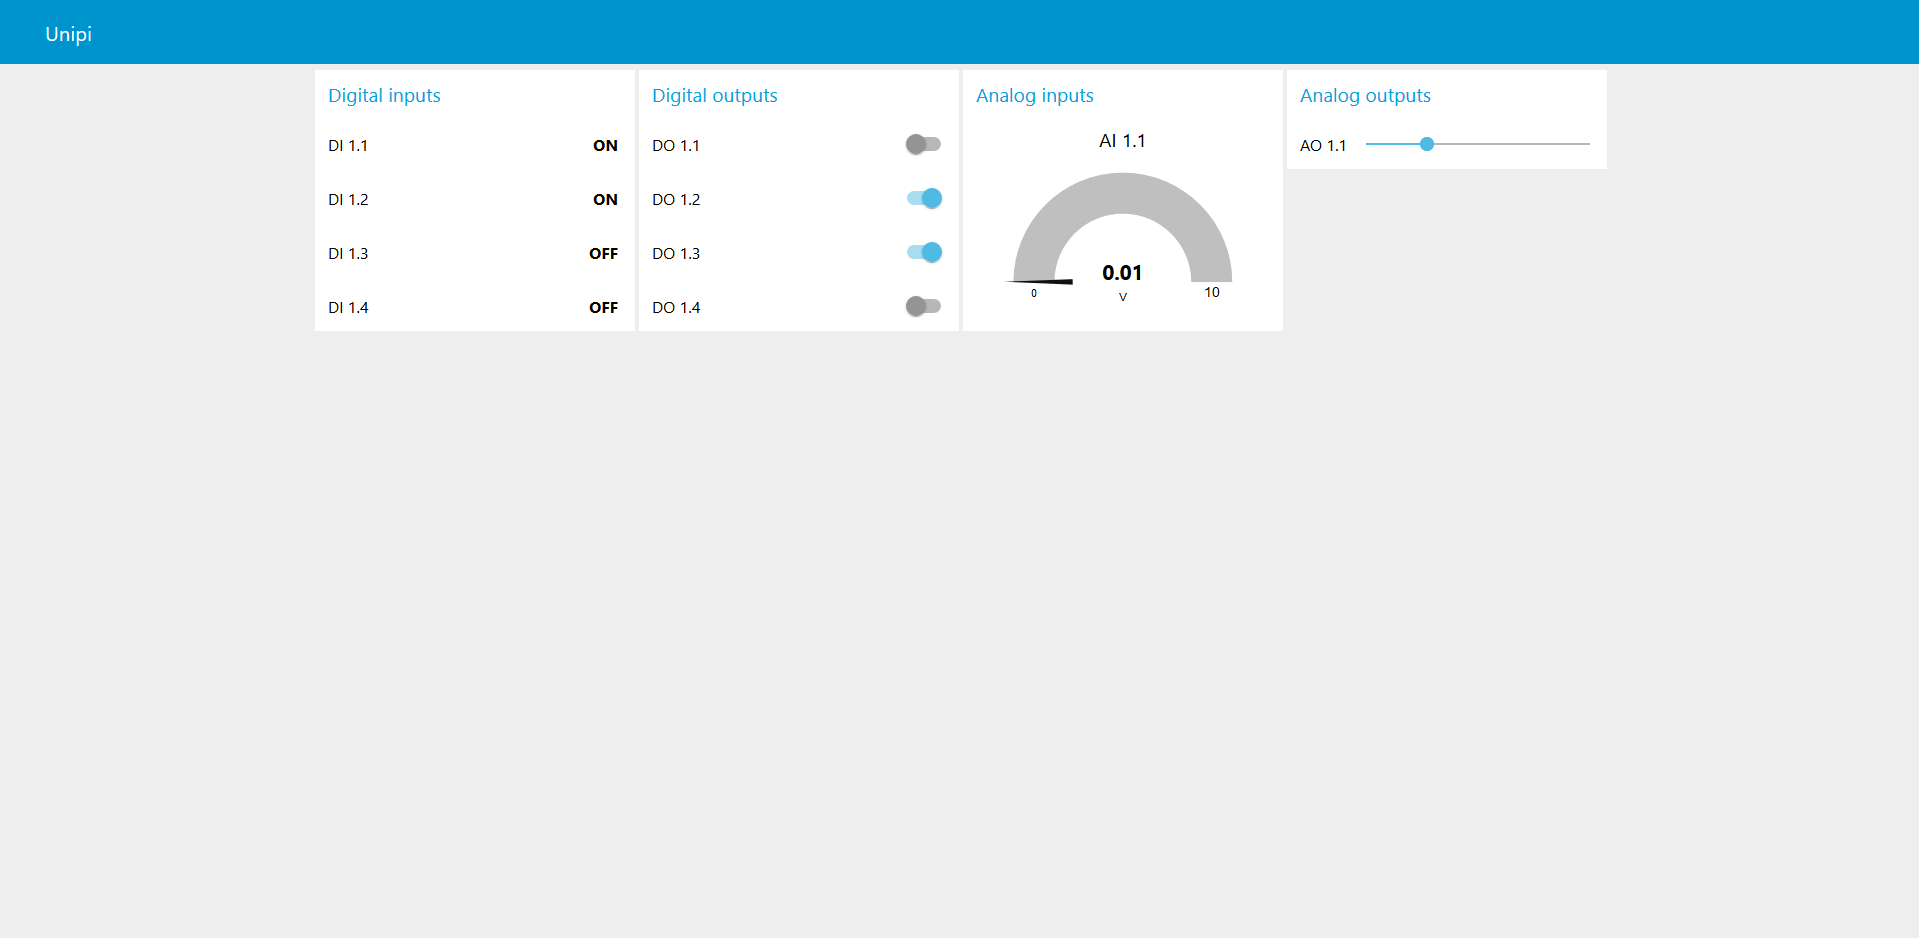
You now have everything you need to create your projects.

Node-RED security

If you did not set up login using the following guide, you expose yourself to a risk of unauthorized access to the Unipi unit. That may lead to potentially dangerous changes resulting in downtimes or limitations. At the worst, unauthorized tampering can damage connected technologies or endanger personnel at installation sites.

That said, it is very important to have your system secured every time you create a new project.


As you will communicate with the unit using the SSH protocol, you need to know the unit's IP address and to have an SSH client installed on your unit. Among the most frequently used programs is the PuTTy application - if you don't have it already, follow this guide.

(i)

Note:
For transfer files between your PC and the Unipi unit you can use the WinSCP utility. Login is the same as for SSH.

After that, just follow this guide on the official Node-RED webpage.

Downloadable projects

Node-RED projects are called flows. On the link below you can download a file with a flow for Unipi Patron / Neuron / Axon units.

default-flow_axon-neuron.zip

Node-RED for Unipi 1.1 (OLD)

This manual will guide you through the entire process of installing Node-RED into your Unipi 1.1 unit. Before the installation please make sure your unit was delivered undamaged and without any visible defects.

Unipi 1.1

SD card preparation

We strongly recommend using industrial SD cards. If you use a laptop, bear in mind most laptops do not feature a microSD card slot and will require a suitable SD or USB adapter. A suitable card can be purchased on the Unipi e-shop.

For a smooth running of Node-RED on Unipi Neuron or Unipi 1.1 units, you will need a card with a capacity of at least 4 GB.

Detecting the unit's IP address

To detect the unit's IP address you can use any of the available LAN network scanning tools. You can also gain the IP address from the DHCP server (if you have access to it). For this tutorial, we selected the Advanced IP Scanner program.

Download and install it, or just launch it. The Advanced IP Scanner interface looks like the following:
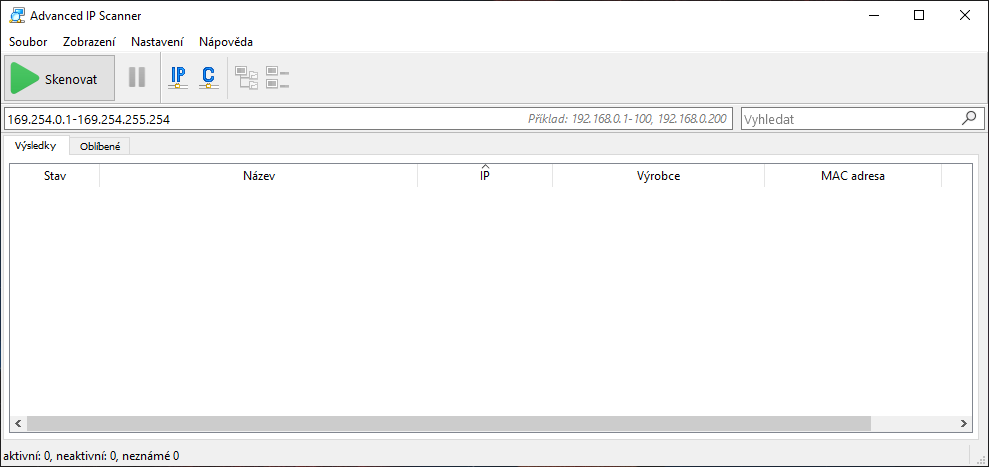
For automatic network selection, click on the icon to start detection of all available networks on all available adapters of the PC. The specific range can be adjusted manually.
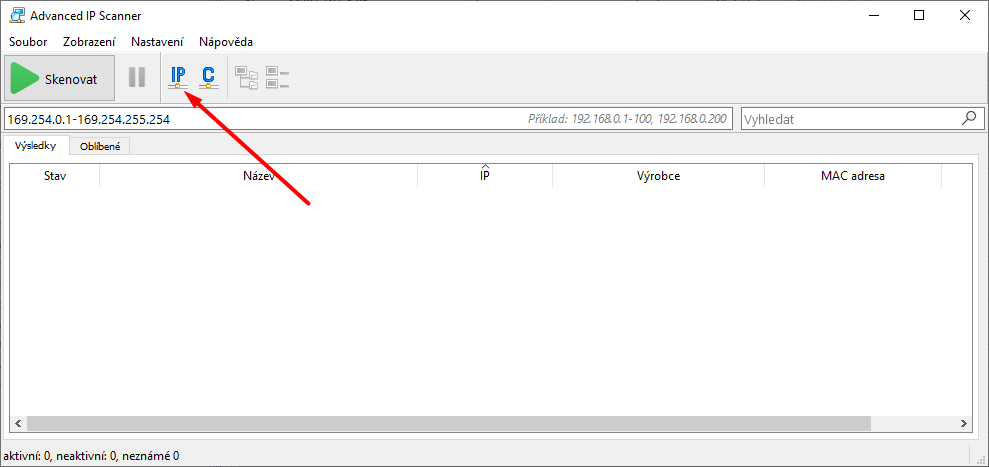
For network scan click on the button.

Scanning local networks will take a couple of minutes. Please wait until your device is displayed.
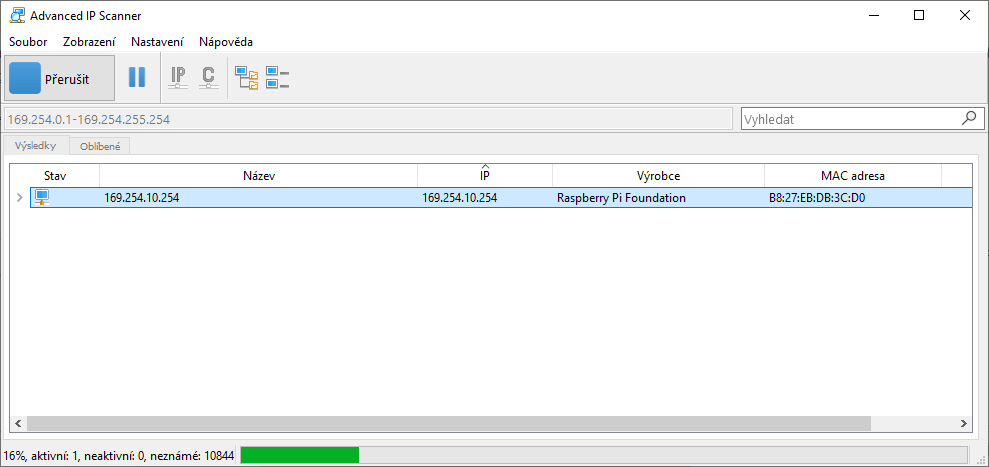
Remember the IP address - you will need it later when working with the unit.

Pre-installed SW

The OS image you just uploaded into your unit also contains the preinstalled EVOK open-source software - an Unipi-developed application programming interface (API) for direct communication with Unipi hardware.

Also available is a practical demonstration of using the API in the form of a simple web application (Unipi Control Panel) serving as a user interface for all inputs and outputs on the unit. To access this interface, open your web browser and enter the IP address of your unit with the port number :80. Port number is optional, as it is the default webserver port.

For example:

192.168.1.10

or

192.168.1.10:80

The application's interface looks like this:

Another software included in the disk image, which is now also uploaded in your unit, is Node-RED. It is an open-source programming tool for connecting hardware devices, various APIs or online services. In this case, the Node-RED software already contains the EVOK API. This API is represented by a pair of nodes in the left panel, section Unipi - unipi input and unipi output made to control both analog and digital inputs and outputs.
Connecting to the Node-RED interface

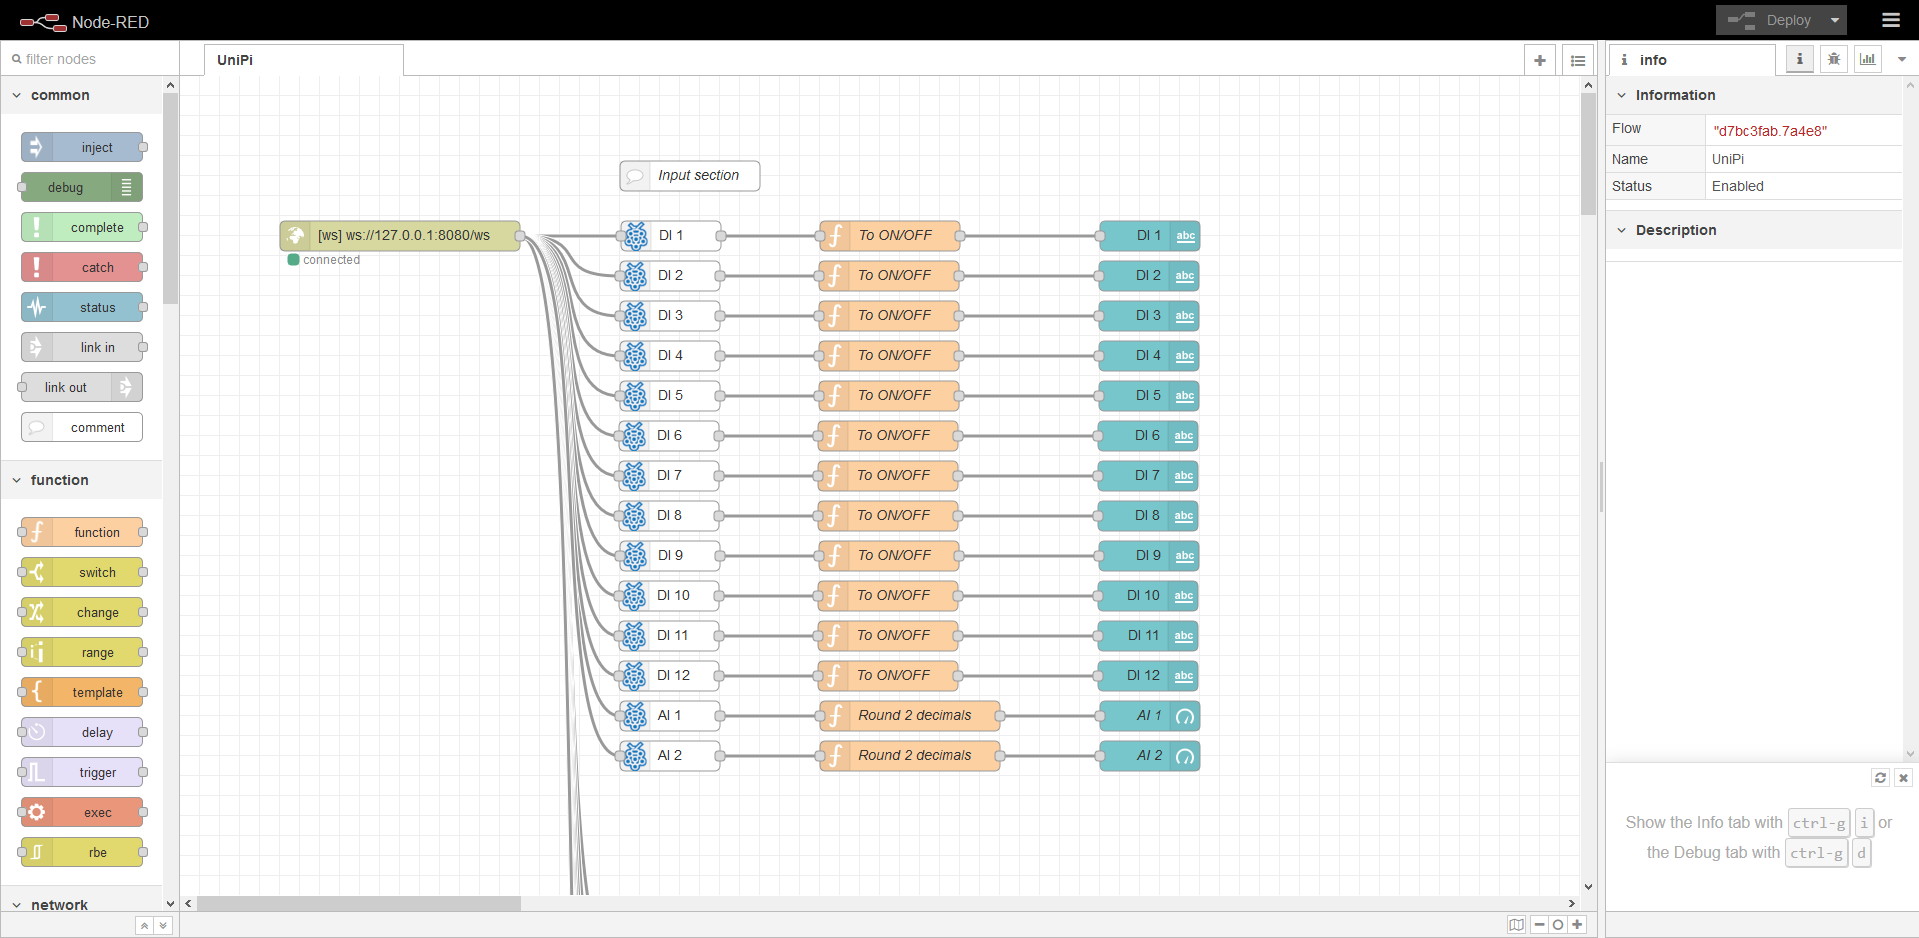
To access the Node-RED programming interface, open a web browser and enter the unit's IP address into the address tab. Don't forget to add the :1880 port number.

For example:

192.168.1.10:1880

The following interface will appear:

You have probably noticed the interface already contains a project. It is a demonstration project for reading inputs and writing to outputs, which is connected with a web user interface → so-called Dashboard. This project (flow) is available for download at the end of the article.

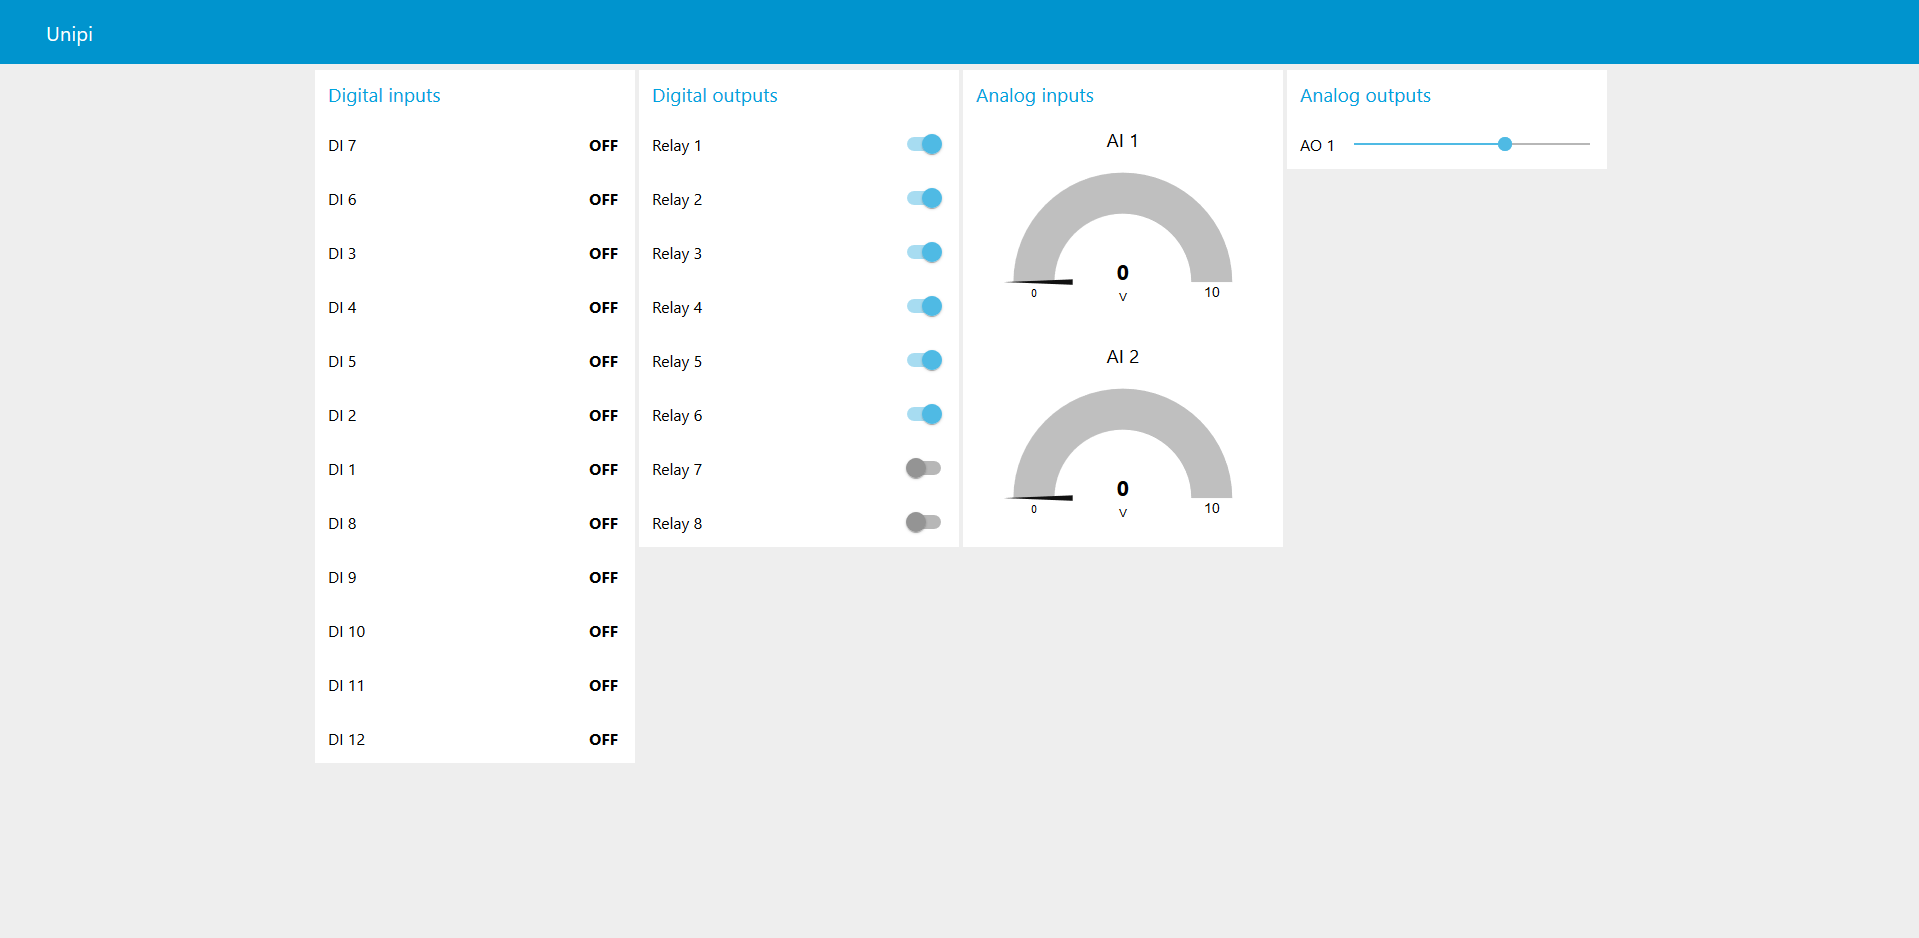
To access the interface, add /ui suffix behind the address with the port number.

For example:

192.168.1.10:1880/ui

The following interface will appear:

You now have everything you need to create your projects.

Node-RED security

If you did not set up login using the following guide, you expose yourself to a risk of unauthorized access to the Unipi unit. That may lead to potentially dangerous changes resulting in downtimes or limitations. At the worst, unauthorized tampering can damage connected technologies or endanger personnel at installation sites.

That said, it is very important to have your system secured every time you create a new project.


As you will communicate with the unit using the SSH protocol, you need to know the unit's IP address and to have an SSH client installed on your unit. Among the most frequently used programs is the PuTTy application - if you don't have it already, follow this guide.

(i)

Note:
For transfer files between your PC and the Unipi unit you can use the WinSCP utility. Login is the same as for SSH.

After that, just follow this guide on the official Node-RED webpage.

Downloadable projects

Node-RED projects are called flows. On the link below you can download a file with a flow for Unipi 1.1/Lite.

default-flow_unipi1.zip