This is an old revision of the document!
Service mode
This mode serves for uploading or backing up the operating system, or for restoring access to the PLC (restoring the default password via OS reflash, changing the network configuration or enabling/disablíng the SSH access). Only the service web interface is available in this mode, all remaining PLC functions are disabled. This mode does not publish mDSN logs.
Gate
Startup in a service mode
The service mode is accessed using the SERVICE button located above the red LED on the Unipi Gate device front plate. As the device's Ethernet ports work in bridge mode (br0 = ETH0 + ETH1) when the device is in the service mode, the ports should never be connected into the same network.
1) On a local network (with DHCP):
- Connect the device to a local network with a DHCP server, using a network cable (RJ45)
- Press and hold the SERVICE button
- Plug in the device's power supply. After a moment the Unipi Gate will switch to service mode indicated by slow flashing of ACT, RX and TX LEDs
- You may now release the SERVICE button.
- You also need to obtain the device's IP address. You can do so either from the DHCP server or by using a suitable program, such as Advanced IP Scanner
2) Direct connection to the device (without DHCP):
- Connect the device to your PC with a network cable (RJ45)
- Press and hold the SERVICE button
- Plug in the device's power supply. After a moment the Unipi Gate will switch to service mode indicated by slow flashing of ACT, RX and TX LEDs
- You can now release the SERVICE button
- Set the IP address of your PC to
192.168.200.100, mask255.255.255.0 - Unipi Gate now has its IP address set to
192.168.200.200
V obou případech následně zadejte IP adresu zařízení do adresního řádku webového prohlížeče. Po potvrzení budete připojeni k servisnímu rozhraní Unipi Gate.
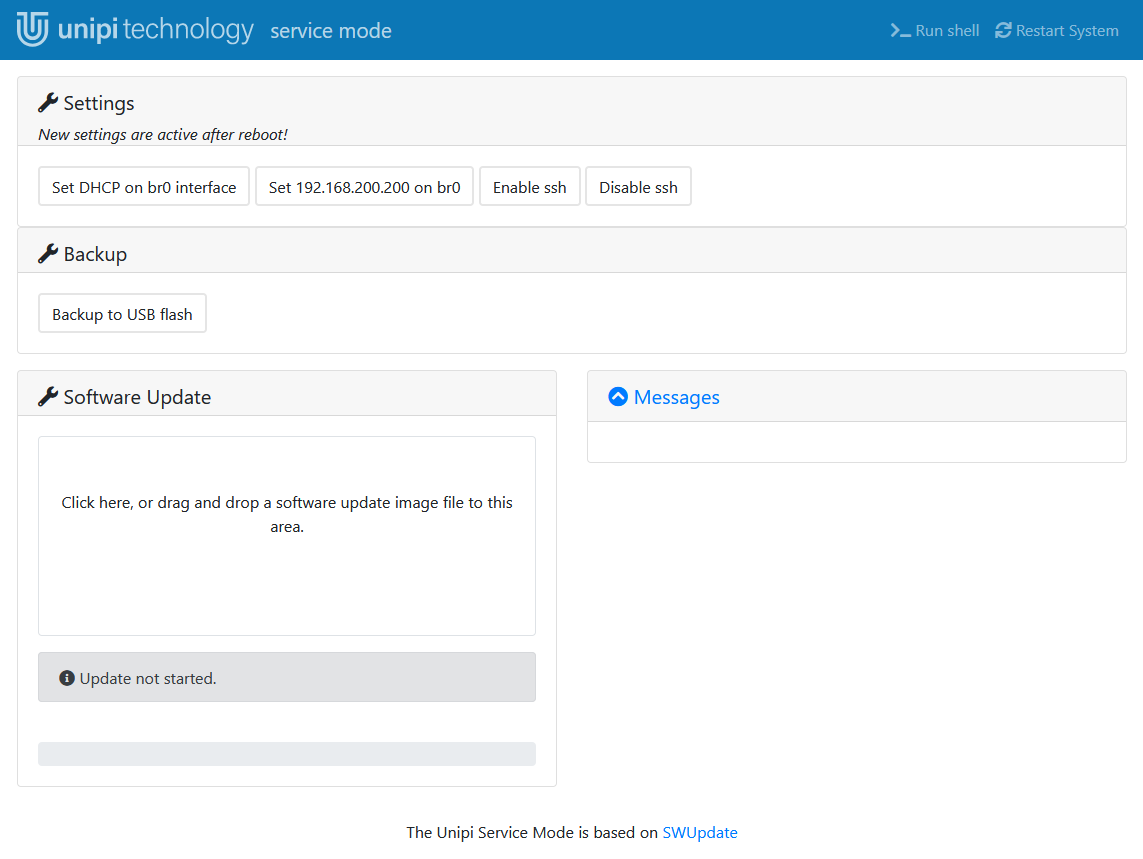
Popis servisního webového rozhraní
Po otevření servisního rozhraní uvidíte horní modrou lištu a čtyři dialogová okna.
V pravo na horní liště naleznete dvě tlačítka:
- Run shell → slouží pro přístup do konzole s omezenými možnostmi (BusyBox)
- Restart system → po stisknutí se jednotka restartuje
Pod horní lištou naleznete jednotlivá dialogová okna:
- Settings → obsahuje 4 tlačítka, všechny ovlivňují pouze nastavení v běžném módu:
- Set DHCP on br0 interface → nastaví pro rozhraní bridge získávání adresy z DHCP
- Set 192.168.200.200 on br0 interface → nastaví pro rozhraní bridge pevnou IP adresu na 192.168.200.200
- Enable ssh → povolí SSH přístup na portu 22, ve výchozím stavu je SSH povoleno
- Disable ssh → zakáže SSH přístup
- Backup → zde naleznete tlačítko “Backup to USB flash”, po stisknutí se spustí zálohování na USB flash disk, pokud je připojen a je kompatibilní
- Software update → toto okno slouží pro nahrání OS do zařízení
- Přímo pod nadpisem okna můžete vidět oblast pro vložení souboru s obrazem OS archive.swu
- Pod touto oblastí máte ještě ukazatel stavu nahrávání / zálohování OS
- Messages → slouží pro výpis prováděných operací